Time for an update of todays work.
A picture to get us started
That was after filling with one heck of a load of water (Andrew filled it don't worry)
We also made a couple of modifications to the cabinet underneath.
First Andrew moved the shelf lower so that the UV unit could sit above the shelf.
Andrew also drilled a hole through from the sump side of the cabinet to the other side for the return to go to the UV (will not be used all the time) and then return to the tank at the opposite end to Durso pipe.
You will also notice that I have put polystyrene underneath the sump.
Here is the sump whilst I was testing the overflow and Durso. I have placed the return pump in position and piped a T piece in with a return line that also goes to the sump, I have a feeling the pump will be a little powerful, if it is not, I can take out the T piece.
The base rock I have had soaking is in the tank.
The sump and Tank
In the post this morning, I received my weir combs courtesy of Big C

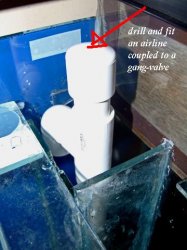
for some reason one side is higher than the other (the glass that is). I have managed to get them at the right height though. I have also used Big C's suggestion to stick the gang valve to the tank at the back.
The Durso from the side of the Tank. Andrew wants me to cover this as it is viewable from his sofa, so I will use some tank backing and make it so that I can access easily to check the Durso and weir compartment.
The return (for the time being) I have used heater suction cups to secure it to the tank bracing and have used clear tubing from the return pump.
Finally the picture of where I am up to at the moment. I did not have quite enough fresh water to set the pump going so this will be done in the morning after I have removed the rock from the Nano. (The new LR and rubble is in the Nano at the mo). I also need to give the sand a rinse and get that in. I will probably remove some of the water so that I can use what is in my HOB refugium (will go straight into sump) and some of the tank water in order to get some of my micro goodies).
I will also transfer the sand from the nano on top of the new sand in order to get the goodies out of there. I will take the opportunity to remove any debris though.
I am going to get the sand in tonight if I can and use my old filter that I use as a powerhead for mixing to put some fine filter floss in and remove most of the dust overnight. I will pile the sand towards the front so that it does not get in the way of rock scaping and I can place the rocks on the glass bottom. I am not using egg crate underneath the rocks this time, this is because I recently had some red / rusty cyano on the sand bed, on reading it must have meant the sand was nutrient rich, I am hoping this was down to the pockets under the rock.
I am still considering if there is a way to incorporate my HOB refugium into the sump as I do not have a large refugium section in this sump. I could also then use this for the DSB.
I think thats it for now. Hope you enjoy the pictures. If you see anything that could be improved upon please let me know, I do enjoy others input.

Tomorrows installment will obviously cover the switch over of rock, coral, inverts and fish. Then we will have the big switch on and I will also let you in on the aquarium and owner of said aquarium that has been my inspiration for the aquascape. I will also let you know what I have purchased from a fellow reefer on a specialist reef forum.


 (I have changed my Morphine, this is a lot stronger, affects my eyes and brain when I am tired)


 I really am a complete idiot when it comes to things like that


