You are using an out of date browser. It may not display this or other websites correctly.
You should upgrade or use an alternative browser.
You should upgrade or use an alternative browser.
Jim's 60 Gallon High-tech Planted Journal
- Thread starter jimboliana
- Start date


jimboliana
Fish Crazy
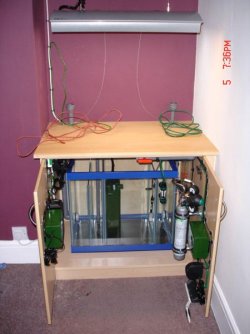
Well i have had a couple of days off to try and finish the installation and am about 95% complete  , i just need to make an overflow box which i will try and do on saturday at the workshop along with a lid for the sump
As you can see from the picture below it is nearly all done, the green/red lead on the left is the heater cable and the green tubing on the right is the CO2 pipe. The two bits of ABS pipe sticking up are on unions so i can move the tank if needed if i get any problems and the white cable going up the sidw on the left is the power for the light, i am away now until friday but the missis will be at how and hopefully she will paint over it the same colour as the wall (if it looks bad i will box it in)
All the power is connected and in place, i had to order some plug converters (SCP3) from http /www.powerconnections.co.uk as most of the equipment i had bought is two pin and these were alot better than the standard ones you just plug into
I will also trim the wires like i said b4 once the tank is in place, oh and one other thing i have forgotton is a thin piece of rubber to go between the top of the unit and the tank
, i just need to make an overflow box which i will try and do on saturday at the workshop along with a lid for the sumpAs you can see from the picture below it is nearly all done, the green/red lead on the left is the heater cable and the green tubing on the right is the CO2 pipe. The two bits of ABS pipe sticking up are on unions so i can move the tank if needed if i get any problems and the white cable going up the sidw on the left is the power for the light, i am away now until friday but the missis will be at how and hopefully she will paint over it the same colour as the wall (if it looks bad i will box it in)
All the power is connected and in place, i had to order some plug converters (SCP3) from http
/www.powerconnections.co.uk as most of the equipment i had bought is two pin and these were alot better than the standard ones you just plug intoI will also trim the wires like i said b4 once the tank is in place, oh and one other thing i have forgotton is a thin piece of rubber to go between the top of the unit and the tank
Attachments
jimboliana
Fish Crazy
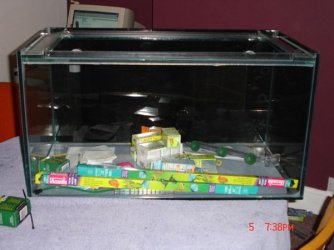
This is just a picture of the tank with the black background stuck on it with cooking oil. I have done the back and right hand side and am leaving the left as i can see about half of the left hand side while i sit on my computer (back of pic, top left)
Also a rather large spanner in the works, my girlfriends sister is coming to live with us for a few weeks (in two weeks time) as she has started a new job in London and need to find a flat to rent so guess what, she will be staying in our dinning room so start up may be delayed (might get some water in it by the end of the year!!)
I'll let you know
Also a rather large spanner in the works, my girlfriends sister is coming to live with us for a few weeks (in two weeks time) as she has started a new job in London and need to find a flat to rent so guess what, she will be staying in our dinning room
so start up may be delayed (might get some water in it by the end of the year!!)I'll let you know
Attachments
jimboliana
Fish Crazy
Also just to say a big thankyou for your comments good and bad, it means alot what other people think as there is always room for improvement
I know it has taken along time (about 2/3 months now) but bear with me it will get done
good and bad, it means alot what other people think as there is always room for improvementI know it has taken along time (about 2/3 months now) but bear with me it will get done
dartos
New Member
I noticed that you are injecting the CO2 directly into the tank rather than the sump and I was just wondering if there was a reason for this. I do not know very much about sumps so if this question is dumb then I apologize. It just seems like it would be easier, but I am guessing that the CO2 is lost sometime in the return pipe due to turbulence?
I am just trying to understand this setup, that BTW, looks amazing!
I am just trying to understand this setup, that BTW, looks amazing!
jimboliana
Fish Crazy
dartos
Spot on, not dumb at all , that is the reason that it is going stright into the tank.
I want the sump for extra volume and to hide the equipment and as you say it can effect the CO2 levels so i am trying to minimise this by injecting straight in to the tank for the plants to use b4 it goes back into th sump
Spot on, not dumb at all
, that is the reason that it is going stright into the tank.I want the sump for extra volume and to hide the equipment and as you say it can effect the CO2 levels so i am trying to minimise this by injecting straight in to the tank for the plants to use b4 it goes back into th sump
When i saw the cable running up the wall in the pic...........i said aw know hes going to ruin it ...........but then i read the post........phew.......it should look cool when you paint it.
Just one question with the setup, are you going to use glass covers or leave it open top.
...........but then i read the post........phew.......it should look cool when you paint it.Just one question with the setup, are you going to use glass covers or leave it open top.
jimboliana
Fish Crazy
Zig
I have got glass covers that i got with the tank that cost me an extra £10 so i thought what the hell its only a tenner and it gives me the option
I will prob run it open top and may get a matching bead that runs round the top to hide the water line and the top of the tank. If evaporation becomes too much then i will put the covers on, trial and erroe i think but i would love to have some plants flowering which would look pretty cool but we will see
Id say evaporation could be a problem but only a minor one, you might have to do regular topups, i was tempted to go open top with my own but in the end built a hood for it, and i also made glass covers, i find once the lights are on there is no condensation on the glass covers the heat probably burns it off, but overnight when the lights are off there is quite a build up of condensation the next day on the glass covers, i just leave the glass covers on the tank all the time with a corner cut off for inpipes co2 etc, and remove them if i have to do any rearrangeing of plants and the like.
Last thing, have you thought about a substrate, any final decisions.
Very very last thing are you still going to go with the Dennerele fertilisers or will you become an EI follower and use dry fertilisers, it seems to be the way to go money wise, i was just working out some maths on dry ferts i bought in the last few days, i spent about 20 Euro and probably will spend another 10 Euro (about 20 stg) and that will do all my macro nutrients for more than a year, doseing every second day, so not bad value.
jimboliana
Fish Crazy
Zig,
I am going with Dennerle Deponit mix with heater cable and then 1-2mm gravel on top and yes to the Dennerle ferts at the moment, will see what happens
I am going with Dennerle Deponit mix with heater cable and then 1-2mm gravel on top and yes to the Dennerle ferts at the moment, will see what happens
jimboliana
Fish Crazy
Just got this reply back from Stefan from Dennerle
I think that clears that up then
UV light destroys the B-vitamins in S7 and Biogrün, bacteria in FB7 and enzymes in Pflanzengold 7. You should not be using UV light on a permanent basis
I think that clears that up then
jimboliana
Fish Crazy
Right now because my girlfriends sister is coming to stay for a couple of weeks in a week i can only get so far b4 i can put the water/substrate/plants etc in and get cycling
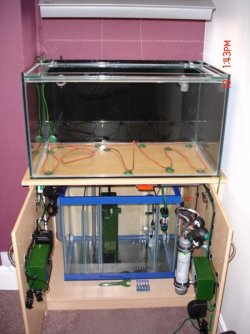
I am trying to do as much as i can but dont have alot of time at the moment during the week as i am working in Runcorn nr Liverpool, so i have put the tank in place, it does not need anything underneeth as it is perfectly flat and clean.
I have tried to put the heater cable in but as always i need some more suckers as there is not enough and need to order some more from http/www.newleafaquarium.com/
Last but not least is the overflow box and the spray bar that will be submerged
I am trying to do as much as i can but dont have alot of time at the moment during the week as i am working in Runcorn nr Liverpool, so i have put the tank in place, it does not need anything underneeth as it is perfectly flat and clean.
I have tried to put the heater cable in but as always i need some more suckers as there is not enough and need to order some more from http
/www.newleafaquarium.com/Last but not least is the overflow box and the spray bar that will be submerged
Attachments
George Farmer
ad aqua
Looking good mate.
I used Algarde airline suction caps to attach my cable. Much cheaper.
Have you decided on a hardscape and initial plants yet?
I used Algarde airline suction caps to attach my cable. Much cheaper.
Have you decided on a hardscape and initial plants yet?
Aussie_Star
Fishaholic
nice setup, cant wait to see it going
Similar threads
- Replies
- 8
- Views
- 640
- Replies
- 165
- Views
- 9K
- Replies
- 1
- Views
- 851
Most reactions
-
 308
308 -
 233
233 -
 204
204 -
 185
185 -
 155
155 -
 145
145 -
 131
131 -
 121
121 -
 100
100 -
 92
92 -
 86
86 -
 84
84 -
 83
83 -
F
77
-
 73
73