Jim's 60 Gallon High-tech Planted Journal

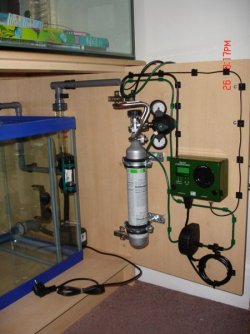
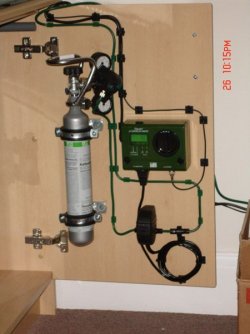
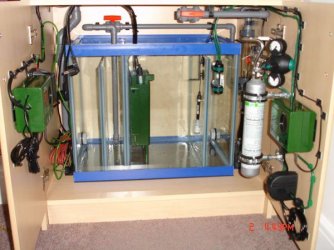
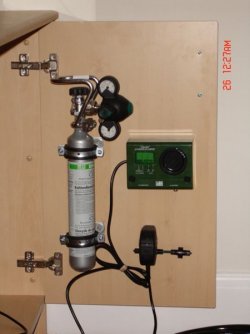
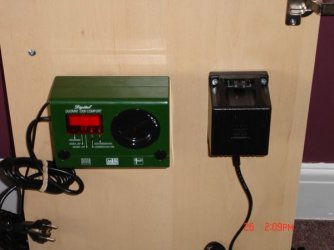
This is a pic of the CO2 gear, as i said i am tight for space so i mounted it all on the back of one of the doors, CO2 bottle/regulator, pH monitor and solonoide valve, i will pst another pic when its finished

On the other door will be the thermostat etc, i will show you in a bit, just off to the workshop to get a couple of bits :D

Unfortunatly i will not finish this until the middle of next week as there is a couple of fittings i need that we dont have in stock at the workshop :(

More pics soon :D
 

Attachments

  • Fish_tank_equipment_028.jpg
    Fish_tank_equipment_028.jpg
    46.9 KB · Views: 61
Cool. That's the size I'm getting in August. 4 to 6 months you say - how do you come up with that figure? If I remember rightly is there an approx. quantity of CO2 the plants use in a given time?

One bit that's slightly confusing me is the cylinder sizes. 500g I assume is 500 grams of actual CO2 - not 500ml (volume of cylinder) as I previously assumed.

edit - Just remembered that if you dose 20 to 30ppm CO2 in a 100 litre tank then this uses approx. 1.5 grams of CO2 per day.

So in my 125 litre - 1.5 grams x (125/100) = 1.875 grams per day
500/1.875 = 267 days.

That's nearly 9 months of constant CO2! Happy Days with that, beats changing my freaking sugar and yeast mixtures every week!!
 
Im dissappointed in you George :( page 103 in your 'big Dennerle guide' gives you a table at the top of the page, tut tut :lol:

Below is a pic of the other door, as you can see its not quite finished yet but will be soon :D
 

Attachments

  • Fish_tank_equipment_029.jpg
    Fish_tank_equipment_029.jpg
    44.2 KB · Views: 52
jimboliana said:
Im dissappointed in you George :( page 103 in your 'big Dennerle guide' gives you a table at the top of the page, tut tut :lol:

Below is a pic of the other door, as you can see its not quite finished yet but will be soon :D
:*) :lol:
 
Well this is about a far as i can go today with the plumbing, i will finish it off during the week.

The pipe with the valve that goes along the top of the sump rfom right to left is a control valve to control the flow to the tank. The end of that bit of pipe will go back into the sump and i can see the flow on the flow meter that you can see on the right

The other open ended bit of pipe on the right is for water changes, this will have a valve on it and when the pump is switched off i can flip the valve and gravity will start a syphon into a bucket so i can change the water

If you look closely at the back of the tank you can make out the two pipes (one either end) for the flow and return

The return on the left will act as a standpipe and i can control the air with the adjustable valve on top :D

Just hope it all works :/
 

Attachments

  • Fish_tank_equipment_030.jpg
    Fish_tank_equipment_030.jpg
    62.9 KB · Views: 57
Right so not bad for a days work :p , about half way there i think

The pic below is to show the finished door with all the CO2 gear mounted on it with all the power cables (thick black lines), rubber CO2 line (green lines) and the pH sensor (thin black line)

I got some sticky pads which you then wrap-round a tie wrap with which then holds the cable in place, i just tried to make it a neat as i could in the small space i have and so i could see and get to everything i.e. bubble counter/flow meter CO2 bottle etc

The other side should be a bit eaiser i hope :D
 

Attachments

  • Fish_tank_equipment_031.jpg
    Fish_tank_equipment_031.jpg
    63.3 KB · Views: 51
I have ordered the extra bits that i need and they should be delivered to the workshop tomorrow so then over the next couple of days i should be able to finish off the plumbing

I have a piece of black rubber that is to go between the tank and top of the unit, just got to cut it to size

I have some how got to make an overflow box with combed edges, might make it out of clear PP but we will see -_-
 
Cheers mate, i do try my best :p . I think i'm like you when it comes to things like this just from reading a thread you said about militery background, my great great grandfather Alfred 'Gunner' Smith won a VC in 1886 and both my grandads were in the second world war and it rubs off on me, everything has its place and has to look as best it can :D just hope it all works
 
Very professional Jim!

Dosent look that way from the pic below at the moment :/ but i hope i can neatern things up and get the wires out of the way, then do a leak test on the bulkheads to make sure i dont get a new swimming pool that i didnt order

You can see on this pic that i have stuck the bubble counter onto the tank, this is for ease of use when reading the bubbles

I'm also thinking of putting the pump on a switch so i can turn it off when feeding so all the food doesnt just zip off down into the sump :unsure:
 

Attachments

  • Fish_tank_equipment_033.jpg
    Fish_tank_equipment_033.jpg
    69.2 KB · Views: 45
Just a quick up-date really.

The pic below is all the sump and equipment 90% done, just got to drill a hole at the back for the heater cable and mount the multi plug adaptor for the six plugs

Just a reminder about tank connectors, test them first! i tested mine today on my sump and they both leaked and i would have had a large flood on my hands.

Solution - Use two rubber seals (one on each side) and use PTFE tape round the thread and make sure they are tight :p

I wil do the same on my tank as above

Tomorrow i will fit the black background and the odds and sods i have to do to finish it all off. One other thing i have got to get is some plug adaptors as they are all german plugs. There is a place in Harlow i will get these from on monday then hopefully i will be ready with lots of buckets/towels to test!

I let you know how it all goes and take some more pics for you all :D
 

Attachments

  • Fish_tank_equipment_034.jpg
    Fish_tank_equipment_034.jpg
    72.1 KB · Views: 53

Most reactions

Back
Top