Jim's 60 Gallon High-tech Planted Journal

All good, got me camera so i will try and post some pics over the weekend though it is also my sisters birthday on sunday (and fathers day for thoughs of you who forgot!) so quite a boozy weekend, i will do my best :D

:bday: to me :beer:
 
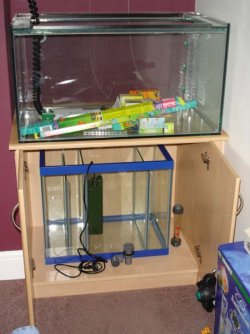
Ok so i'm playing with my camera b4 i go out and here is a pic i took of the sump in the unit with the now decorated room, as you can see the sump does not give me much room to play with but i think i have worked it out so i can fit everything in :/ i hope
 

Attachments

  • Fish_tank_equipment_019.jpg
    Fish_tank_equipment_019.jpg
    64.1 KB · Views: 35
Thanks everyone, its the big 30 next year :(

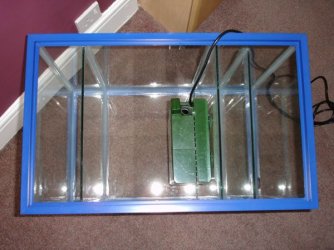
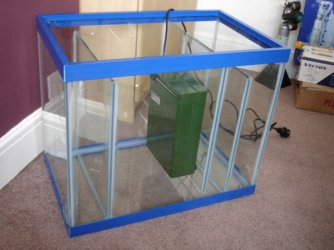
Well after a request from shuhu in another thread i am going to go into detail abit about my sump. The sump is 24" X 15" X 18" (LWH) and was custom made. The sump has four chambers/three baffles with two holes drilled in the bottom ends for feed and return

The water enters the fist chamber and rises up over the first baffle into the second chamber then under the second baffle trapping any bubbles and debris on the way. The water then enters the main chamber where the power filter is housed and up over the final baffle out of the hole and pumped back up into the tank :D

The last baffle also acts as an evaporation chamber where i can see how much water evaporates per day/week as well as a baffle to stop the filter/heater from running dry even if the pump does its alot cheaper to replace the pump than the filter

The sump will also house the thermometer and the pH diode and as i have said b4 the CO2 ladder will be in the main tank :D
 

Attachments

  • Fish_tank_equipment_021.jpg
    Fish_tank_equipment_021.jpg
    67.7 KB · Views: 39
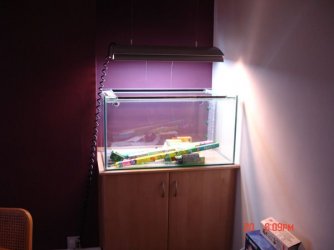
This is a pic of just the fluros on and the front tube is one of the new Dennerle Special Plants, you can see the yellow tinge it gives off if you look at the wall on the right, the back tube is an Arcadia Fresh Water Lamp.

Also today i have started to order the pipework and valves/clips etc so i will start the plumbing this week and keep you all updated :D

As you can also see i have not fitted the black background yet but again that will be done very soon
 

Attachments

  • Fish_tank_equipment_025.jpg
    Fish_tank_equipment_025.jpg
    39.3 KB · Views: 42
Wow . . . this is looking to be a fantastic project bro. Love the sexy all-glass design. :eek:

I don't know much about the big high-tech set ups, because I've never done one. :X

Hmm . . . but I kind of consider myself an artist of sorts . . .
cube_frontfeb2005.jpg


Well, I just have a comment to say about the backgrounds . . . I'd be careful with those intricate backgrounds, because if you don't like it . . . well, it's hard to get rid of. Plus, it means that your tank will always be an "up close" shot. The tank can look like a section of a river bed, but it cannot look like a mountain (as in my tank above). A lot of people like to use their tanks as canvas' and part of the fun sometimes is making a new work of art out of the same tank.

such as this:
terrarium1.jpg


Turning into this:
vivarium1.jpg


Hard to do when you have a background glued to the back.
 
looks good tear scar

my advice would be to follow bloozoos advice and attached the backgorund to a piece of board and then place that behind the tank. as a vairant of this i have painted boreds black and placed them behind my tanks, looks great and can be easily removed or changed by using a second peice of board
 
Thanks tear-scar

Your tank looks great mate, on the background front, i am opting for a black background that is not permanant so i can change if i like, as you say if i didn't like it or just wanted to change it then i would be stuck

I have most of my plumbing gear and will be starting to drill holes etc and putting up fixings and fittings on sunday (at long last :p ) so i should have lots of pics to show you all, if i dont get it finished on sunday then it will be next weekend as i am doing long hours at work at the moment :/
 
If you can get some black velvet and maybe attach it to a board to keep it rigid, the velvet is really effective at absorbing light and will give you a nice deep black background, just tilt it slightly to find the optimum light absorbency (is that a word?) anyway its used a lot in photographic studios for that very reason.

Or if you have some clothing or small bits of black velvet give it a try.
 
Thanks for the advice zig :D but im going to use the black stuff you get from the lfs which is blue the other side and gf225 has given me some advice on how to fix it.

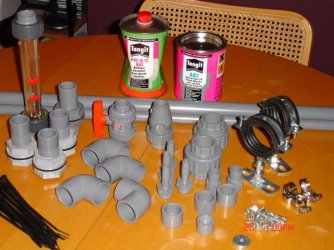
Below is just a pic of some of the fixings and fittings im going to be using (not all of them) in the plumbing. As you can see i have ball valves, non-return valves, unions, a flow meter, tank connectors, hose tails, elbows, screws, glue and cleaner etc, you get the picture :p

The rubber lined rings are for the CO2 bottle as i cant fit it in the stand as the stand is too big (or is that the sump i measured -_- )

Well i will post some more pics as i go along

I do hope all you boys and girls are enjoying all this :lol:
 

Attachments

  • Fish_tank_equipment_026.jpg
    Fish_tank_equipment_026.jpg
    71.4 KB · Views: 43
Awesome. Rather you than me - I have no clue when it comes to plumbing!

Yeah cheers mate, i do this for a living and i have given myself the smallest spac possible to work with which i dont recommend, it's going to be tight

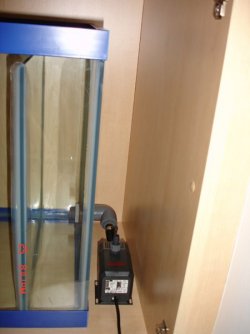
As you can see from the picture below, when it comes to plumbing, give yourself as much room as possible (unlike me :( ) and plan as much as possible (Jim, start taking your own advice :p

In this space i have got to fit quite a bit of pipework but with all the right planning it should be fine, he says :whistle:
 

Attachments

  • Fish_tank_equipment_027.jpg
    Fish_tank_equipment_027.jpg
    43.1 KB · Views: 40

Most reactions

Back
Top