🌟 Exclusive Amazon Black Friday Deals 2024 🌟

Don’t miss out on the best deals of the season! Shop now 🎁

Simple woodworking

Flushable Pets

Fishaholic
2x Tank of the Month 🏆
Joined
Aug 4, 2020
Messages
606
Reaction score
1,150
Location
Ohio
I came across some old photos the other day and among them were some builds I did related to keeping reptiles. At the time, I had no previous experience, plans or tools besides hand tools. I just knew the dimensions I needed and went for it. They weren't fancy, but they were functional... And cheap! This is only a small fraction of my builds, but these were the only pictures I came across.

Amazon tree boa enclosure
FB_IMG_1608699993315.jpg


Irian Jaya carpet python enclosure
FB_IMG_1608700014875.jpg


Random 4ft cages
20210114_131618.jpg


Amazon tree boa enclosure in progress and 4ft cage for a Nigerian uromastyx
20210114_131707.jpg


One of several different racks I built for my larger breeding snakes. This particular one had various corn snakes.
20210114_131645.jpg


Another rack with various ball pythons
FB_IMG_1608700112629.jpg


Rat rack for feeder rats, mice and African soft furs.
FB_IMG_1608700059261.jpg


Then I got out of reptiles and didn't build anything for several years until this past summer during quarantine I build a table with leather straps to hang wine from for my mother and her boyfriend.
20200525_211724.jpg
20200525_211840.jpg
 
Well done. I especially like that last table. Some of those wood grains on the top look fantastic.

As for those stands and enclosures, sometimes there’s a beauty to simple construction, when you obviously took the time to make nice cuts and have everything measured accurately, plans or not.
 
Well done. I especially like that last table. Some of those wood grains on the top look fantastic.

As for those stands and enclosures, sometimes there’s a beauty to simple construction, when you obviously took the time to make nice cuts and have everything measured accurately, plans or not.

With the exception of the 2x2s I used for the legs, it was made entirely with 1x2 furring strips. The cheapest crap they had at Lowes. I picked the ones that had the nicest grain and hit it with a blow torch to bring out the grain. I couldn't find any red or blue stain for the top except for online and it was quite expensive. So I actually used several coats of food coloring to achieve the color. The stars are paint and at first I was devastated because the food coloring had bled into the paint since it wasn't sealed yet, but it actually created a neat worn/patina effect if you see it in person. A large part of the sanding was done by our 6 year old daughter. She wanted to help, so I set her loose with an orbital sander since it's nearly impossible to hurt yourself with one. Those 1x4s were for a different project that never materialized after the "dark cherry wood" stain came out looking purple. Thanks, Minwax!

20200511_110237.jpg
20200511_204116.jpg
20200512_122956.jpg
 
Wow, those are even still some better pictures.

cheap stuff from Lowe’s, so probably pine or spruce. Not to bad with the grains showing through! Looks great.

I’ve heard of people using food colour for stains before, and given how well it turned out on your project, I’m definitely putting that idea into the reserves for future considerations.

I actually got to town on my first live edge slab project over the holidays. I made a coat rack with a shelf on top

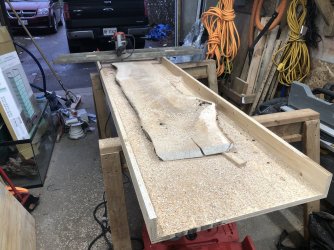
its sugar maple, I made a router sled to flatten it because it twisted on me, I had to remove about 1 1/4” of wood to get it flat on both sides.

but it turned out nice. I will be looking to use some of this live edge into a stand in the future.

I think I might also take some of my scrap maple and test your food colouring stain, can you elaborate on your mixtures you used?
 

Attachments

  • CA63BC6B-210F-4C4F-90B2-5918C02F60EE.jpeg
    CA63BC6B-210F-4C4F-90B2-5918C02F60EE.jpeg
    442.5 KB · Views: 123
  • BCC07608-67C9-487E-B9B0-204FB7FE0C12.jpeg
    BCC07608-67C9-487E-B9B0-204FB7FE0C12.jpeg
    183.3 KB · Views: 111
  • E779F7F9-AA97-4C31-97D8-9CC89F178F32.jpeg
    E779F7F9-AA97-4C31-97D8-9CC89F178F32.jpeg
    318.3 KB · Views: 112
  • 62106081-9234-4A5B-8E56-4DECD89D454B.jpeg
    62106081-9234-4A5B-8E56-4DECD89D454B.jpeg
    177.3 KB · Views: 117
  • EA7967EE-641F-41EC-8206-E83B9D651E60.jpeg
    EA7967EE-641F-41EC-8206-E83B9D651E60.jpeg
    260.1 KB · Views: 113
Also, did you sand it after torching it? Is that how it came out after torching.

last time I torched a piece I cooked it black, then took a wire wheel to it on a drill, it was pretty cool looking, but it turned out very dark.
 
Wow! That is a beautiful piece of wood! Pieces like that cost absurd amounts here. We have a lot of saw mills around here and a slab of quality hardwood like oak, walnut or maple big enough to do a countertop or small dining table costs thousands. Way out of my budget.

As far as torch burning, I just lightly toasted the wood while keeping in constant, even motion. Even a fraction of a second too long in one spot and it would burn. I don't know if I used proper technique or anything like that. I just went for it. And yes, I did lightly sand it afterwards to even out my mistakes from burning it. It was never meant to be perfect.

As far as the food coloring, I used a gel that I found at the grocery store that didn't have any sugar or anything like that. It's the same stuff that you'd use for baking. I let it soak in for a bit, wiped the excess off and let it dry for a few days. Then I gave it a couple coats of clear coat from a spray can. I originally tried the stuff from a dropper bottle and it worked, but the colors weren't vibrant enough.

This was all done on pine, which I'm sure you know is a lot more porous than hardwoods. I'm curious how it would take to something like maple or walnut. My concerns would be that it might not get absorbed very well or be uneven.

I was originally going to use was Rit dye, the stuff people use to dye clothing, but our Walmart didn't carry the colors I wanted. I'd imagine that stuff would be pretty effective.
 
Last edited:
Loving this conversation. So cool to watch what capable people can accomplish!!!

Also, props on letting your kid get involved :) makes me think back to my own childhood, my dad let me help him with all kinds of projects and I am a more competent human being for it :)
 
This was all done on pine, which I'm sure you know is a lot more porous than hardwoods. I'm curious how it would take to something like maple or walnut. My concerns would be that it might not get absorbed very well or be uneven.

Those were my thoughts exactly but I’m a sucker for experiments and I still have another slab from the same tree, so I’ll have some extra to test on.
 

Most reactions

Back
Top