Progress...

nice, although i still dont understand this air lock guff, i've got two of these filters, i've cleaned both of them about 3 times and never got an air lock. Are you sure you have both taps on the tubes open ? sounds odd :|

I did have to disconnect all the pipework and everything. Oh well, no matter.

Fishies are all ok, very happy now! Tank looks so nice after 100% waterchange, guess my wood is still leeching, didt realise how 'brown' the water was!

They love the fact the plants are all floating, if it wasnt for the drcrease in lighting, and getting sucked into the juwel internal (that I must get round to removing...) id get some floating plants for them.
 
Finally removed the Juwel internal...now I have too much space!
 

Attachments

  • picresized_th_3009259b5701f30bd714bc0dda081f1e.jpg
    picresized_th_3009259b5701f30bd714bc0dda081f1e.jpg
    65.6 KB · Views: 75
new pic

Also testing this link...

http://s1098.photobucket.com/albums/g380/jojouk1/?action=view&current=picresized_th_d272ad2113dbd226ab735a395cf6de6c.jpg

http://s1098.photobucket.com/albums/g380/jojouk1/?action=view&current=IMG_1695.jpg
 

Attachments

  • picresized_th_d272ad2113dbd226ab735a395cf6de6c.jpg
    picresized_th_d272ad2113dbd226ab735a395cf6de6c.jpg
    95.5 KB · Views: 76
Ok, am dipping my little toe into the DIY CO2.

Rio 180 = 40 imperial gallons (not accounting for my fairly substantial substrate and hardscape)

2 x 30w T8's = 1.5 WPG

- Im looking to add an additional single T8 strip to the back flap (for those who dont know Juwel tanks, they have flap type lids) which will boost my light to 2.25wpg, or maybe a T5 depending on what people think?

However, I thought I would get started.

Bought the sugar and yeast.

Made my bottle kit!

Not sure about the diffuser - but its all I have at the moment!, It does produce quite fine bubbles... going to try and get it set up to do a bottle with a 2 week life, rotating changing the mix every week, if that makes sense. Will keep you posted on how that goes though!

Im currently dosing excel and ferts, will stop excel when I try the CO2.

- Does anyone think that I should start the CO2 with my current lighting and see how it goes? or wait until I upgrade it?

IMG_2018.jpg


IMG_2020.jpg


IMG_2019.jpg


IMG_2017.jpg
 
I think you might struggle with the DIY setup on a tank so large, but good luck, i'll be interested to see what results you have.
 
I think the main problem is that its an unstable delivery and you cant really automate it so lots gets wasted, at least the bubble counter bottle will stop the gunk from entering the tank. :good:
 
Yeah, I have done LOTS or reading about it all. That's the idea With using 3 bottles, to kinda even out the levels, make a slower, longer-lasting mix, but with more bottles. The theory being of course that at least 1 bottle will be at its peak output all the time...

But let's see how it all goes...all good in theory eh!!!

Bring on the algae!! :)
 
Right, set up the co2 a few weeks ago, but had to wait for a drop checker to arrive from hong kong, then I decided to upgrade my lighting...

So now I am installing my Hagen glo t5 unit..on the flaps of the hood.

I have covered the flaps in tinfoil first, until I get enough money for reflectors.

I also have a new led moonlighting strip I'm installing.

I'm tackling this now, so pics will follow soon if anyone is interested!!

Once that's all done, co2 trials begin!!
 
Ok, so havent posted on this in a while, so here is amajor update:

1) Upgraded to T5 lighting! Bought a Hagen Glo T5 unit for 36" tubes. Bought the lamos themselves online for a great price - from http://www.lampspecs.co.uk/
Got a selection of different bulbs to see what shade of white I liked best.

I have attached them to the flaps of the hood. Also installed DIY light reflectors - in the form of Bacofoil superglued to the insides of the lid...

This is mid upgrade...chaos, and the cat is very intersted in going on!

IMG_2121.jpg


Pic of the Bacofoil...

IMG_2122.jpg


Drilled holes into the lid flap, had to widen the hole for the bolts to go through on the little black clip holders, as the smallest nut/bolt bag I could get was too big. Bolted them all on, and fitted the clear clips.

IMG_2123.jpg


This is how they look on the oter side...they still need cutting down and painting black so they dont look so obvious.

IMG_2124.jpg


And this is the whole thing working and in place.

IMG_2133.jpg


YAY!

Before:

IMG_2130.jpg


After:

IMG_2134.jpg


Also installed my new LED lighting system. Can have 15 different colours, or a flashing disco effect...not so good to use on a fish tank!

IMG_2538.jpg


IMG_2540.jpg


IMG_2542.jpg


IMG_2543.jpg


IMG_2539.jpg


Not so keen on the red... :)

Also have sorted out the middle panel for hiding the external filter. Bit of chipboard covered in wallpaper!

IMG_2536.jpg


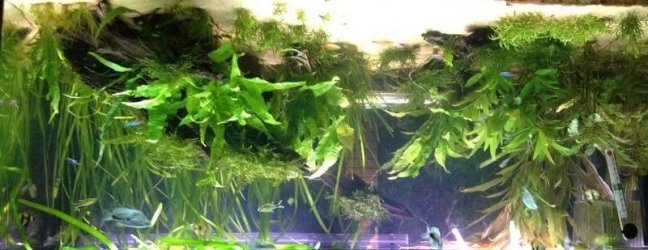
Very happy overall...now bring on my new 5 foot tank in April!!

AND...

DIY CO2 is going really well. I roughly change a bottle a week (or when I notice that the bubble count has decreased a little).

The drop checker stays lime green all the time, and the plants are happily pearling away every day. The moss especially is very happy.

I had a BBA outbreak, which was caused by having the new T5's on too long per day, not used to the higher lighting! So I kept the tank in the dark for a couple of days (conveniently when I went away for the weekend) and spot dosed a little bit with some Excel.

Good news was the BBA died off, but the bad news was that the excel turned all the vallis to mush.

That has now all come out, and I have had a little move about. Bought a few new plants. Ill take a new updated pic of the tank tomorrow and you can see how it looks at the moment. :)
 

Most reactions

Back
Top