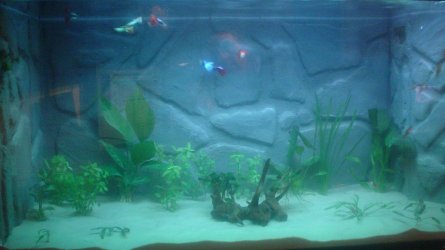
Holy Cow!!!! That's so freakin amazing!
Is there a post about how you did that? I see that you cut the (i just realized I have no idea how to spell that word) away but what did you do for that surface? I must know! I absolutely love it and the tank looks beautiful...as do the fish!
I don't have a post specifically about it, but it was created as follows:
Polystyrene ceiling tiles were cut into strips approx 30mm wide and one strip was given a gently curved line across the front edge. This was used as a template for all other strips.
Each subsequent strip was marked with the template, but the cut was made to waver from side to side generally along the line. (In other words, as you cut, you start just inside and then cross over to just outside or vica versa).
The cut strips are then stacked up along the back edge of the fish tank, alternating where the cut was made so that no two pieces are exactly aligned. This creates the strata levels in the rock work. In my first tank, the strips for the lower third were cur wider. This was to create a ledge along the length of the rock wall.
It can sometimes be helpful to fix a sheet of poly up the rear of the tank as a backing. Gluing the pieces together is done using AQUARIUM silicon sealant. DO NOT be tempted to use bath room silicon.It contains antiobacterial additives which will kill the microbes which are part of your filter process.
The area around the filter box was created separately but in the same manner,and blended in. Careful thought has to go in to the creation of the cave oin the right hand side which is located under an overhanging rock area. This cave is actually one of the water inlets into the top of the filter, and the diagonal 'crack' in the middle of the lower rear section is the second water inle to the heater. The filtered and heated water is ejected through the pipe poking through the upper right hand side.
Finally, the bit which shocks everyone.... CONCRETE!!!!
When all the polystyrene work is completed and test fitted, all visible surfaces are given several coats of ready mix cement. (Yes... the stuff that builders use to stick bricks together). In the UK, a 2kg bag can be bought for around £2.85. (approx $4 for a guess).
The concrete powder is simply mixed with water thorougly and painted on to the surface of the rocks. A first coat should be mixed to a fairly watery consistency and is easily applied with a paint brush and left to dry. A second coat is made to a creamy texture. This is also painted on, but can be harder to apply as the first layer will instantly try to absorb the moisture from the new mix. A third, (and any subsequent coats for touching up) should also be quite watery.
When you are satisfied with the finished product, it will have to be THOROUGHLY rinsed several times. This will remove small particles from the surface but also dissolves most of the lime contained in the cement which will create havoc with your Ph levels.
Either put your rock wall in a bath (weighted down) and fill/empty the tub several times or fix your rock wall into your tank using more silicon. Use plenty - polystryrene is very bouyant so you have to make sure it's well stuck to the glass. Rinse several times, (either in the bath or after fitting) allowing it to stand and soak for maybe an hour each time before emptying. Eventually you will find the water remains clear. Check the water quality as normal to ensure success.
That was the process for my original tank. This renovation project was tackled in a slightly easier way. Polystyrene sheets or tiles were cut to the size of the back and sides of the tank to provide a simple backing. When not large enough singly, two sheets could be fitted together which a third sheet behind across the join for strength.
Then, remaining tiles were broken/torn by hand into pieces of varying size. A knife scraped along the edges helped to make them less angular as it removed bits of tile. These pieces were randomly glued to the backing using silicon and the finished wall was painted with cement as described before.
There are numerous videos availible on youtube if you search for "DIY 3D aquarium background" or similar.
Good luck!
Trev

