I decided to set up a fish room and of course the first thing I had to deal with was a stand to put some tanks on. I didn’t want to have a bunch of single tanks with the cabinets underneath because I don’t have the space to waste on things that look like furniture in that room. Cost was a definite factor so I began by deciding no fancy stains and no high priced hardwoods. I also had a restriction of doing no harm to the flooring so I had to use a design with minimal impact on the floor surfaces. That meant no skinny legs touching the floor. I came up with a basic design that I like but I must warn everyone that although I am happy with this design, I do not recommend that anyone copy it believing that I have done an adequate design. I am not a designer except in the broader sense of knowing what I like. My open framework design gives me access to the top and bottom tanks with no real restrictions. I tried to leave enough space around things to allow easy maintenance and so far I’m happy with the results.
I started by cutting the top and bottom shelf frames to size. The size is the largest that I would want in terms of a tank plus enough extra that I can slide a tank in and out with no trouble. In my case I was designing for a 4 foot long nominal size tank so I made the top shelf 4 ft 6 inches long. Front to back the tank measures 12.5 inches but I wanted it to be ready for a 90 gallon that is 18 inches front to back. I made the shelf 19 inches total front to back but the frame sits under it completely so the bottom shelf needed to be smaller. The bottom shelf is only 4 ft 4 1/2 inches long and 17 inches front to back. That allows it to sit inside the legs that support the top shelf.

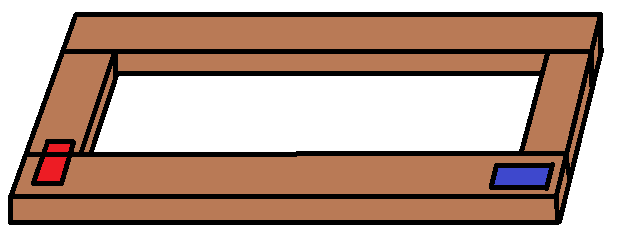
The bottom shelf frame is similar but I made the inner brace toward the back instead of toward the front of the shelf. If I put a small tank on the bottom shelf, I want the back edge supported so the inner brace goes where the back of that tank would be. If I put a smaller tank on the top shelf it sits toward the back so the inner brace goes toward the front to support the front edge.
Also shown in this drawing is the location of the 2 by 2 inner legs that actually support the weight of the top tanks.

Start by deciding how big to make the stand and then develop your materials list. I have found that in general the nominal 1 inch thick wood is plenty for a typical stand if you take the trouble to use 2 pieces at right angles at each corner. These pieces serve 2 purposes. The first is to brace the inner legs so that they will stay where they are intended to be, supporting the top frame. The second is to prevent the stand racking.
Racking is a term that refers to what happens when you have a square or rectangular object and grab opposite corners and squeeze them in to distort the squareness. You end up with a parallelogram right before the whole thing fails. In a tank stand it is what will happen if the legs are not vertical or are not braced to prevent it. The weight on the top shelf will gradually bend the legs further and further away from the vertical until the strength of the things you have used is exceeded, at which time it will fail completely in a second or less. The water cleanup alone makes bracing against the motion worth doing well.
I made the bottom frame from 6 inch wide boards because my experience with lower shelves told me that too close to the floor was a bad idea. I never want to use legs to provide the support at the floor itself so my only way to raise that shelf was using 6 inch boards instead of 4 inch. The top frame was made with 4 inch lumber because it was strong enough and it let me have more room between shelves without having the top shelf too high.
OK time for some real world pictures instead of drawings. I laid out the cut pieces where the stand was destined to go so that I could make sure it would fit as expected and I wouldn’t need to carry the assembled stand too far. First step was to check the floor for level and get ready to trim the bottom boards to level the stand. Because the bottom frame rests directly on the floor, there is no way to adjust a leg to level it later. If I ever move to a new house, I will need to disassemble the bottom frame and trim it to fit the new home. That’s another good reason to use 6 inch wide lumber for the bottom frame.


Next step was to trim the boards that make up the bottom frame so that when assembled, everything would be level. I was surprised to find how far out of level the floor was. This is a relatively modern house that seems to be well built but apparently level floors was not a major focus for the builder.
Next up was assembling the top shelf. The picture also shows the cut pieces for the bottom frame and some of the inner legs.

The legs are assembled from 3 pieces each. They have a 1 by 6 and a 1 by 3 wrapped around a 2 by 2. Since the 1 inch lumber goes from almost the floor to just under the top shelf it is longer than the 2 inch lumber that is pinched between the top frame and the bottom shelf. This leg is shown with the notch for the bottom shelf on the left and the notch for the top frame on the right. If I did it again, I would cut the outer leg braces to custom lengths so that all of them would look the same distance from the floor when the stand was done.

The joint between the 2 pieces of 1 inch lumber are made stronger by fitting them to each other as shown here. Note: The legs on the right and on the left are not the same as each other, they are mirror copies of each other. The front and back legs on a side are identical to these but of course that means they wrap the frame differently.

Next step was to put the surface boards onto the bottom shelf. This gives the legs a place to rest on the bottom since they do not quite reach the floor. Shelf material is shown in place. I usually use ¾ inch plywood to top this basic design. On this one I used 1 inch thick boards, actually ¾ inch, because I realized that if I used plywood I would need a full sheet and about half of it would have been waste material. If you look closely you can tell that the bottom frame gets shorter from left to right. The floor was actually that far out. You can see legs standing around and the top frame is visible at the far right of the picture.

Once I had the pieces of the frame built it was time to do a dry fit of the parts and make sure everything was going to fit and both shelves would be level. This picture is not really in sequence but shows what the stand looks like when the legs are attached to the bottom frame and then what it looks like once fully assembled. You can see in the fully assembled picture how far the legs are off the floor. The width of the outer legs lets me space the screws far enough apart that racking is prevented. It is sort of like having a short diagonal brace.


In reality, I fully assembled the stand and checked for fit, then removed the top shelf and frame to make painting easier. I had no desire to crawl around on the bottom shelf trying to paint the bottom of the top shelf.
The color was my choice and would probably suit nobody else but I wanted it dark and easy to keep clean. This is what it looked like after the first coat of paint and then after being reassembled.


This is the stand finally painted and in its final home with a 45 gallon long on it. The back edge of the 45 is sitting right above the “inner brace” of the bottom frame so its weight is carried directly by the floor. It is as if I had set the tank directly on the floor and leveled it with solid shims.

After the paint dried I pulled the shims out and let the bottom frame down onto the floor instead of resting above it on wood strips to avoid marring the flooring. Picture looks almost the same except for the small strips spacing it off the floor in the first picture.

A sample of what it might look like with 2 smaller tanks on the top shelf. The one on the left is a 10 and the one on the right is a 20 tall. I just did it to get an idea of how I was doing. The 10 has its own metal stand.

Tried a setup where I used sand with a large power head and a sponge filter on the 20H but the sand would not settle properly. You can see the “beach erosion” and sand dunes that it was building.


Thankfully I had another filter cycled and ready to go so I swapped them. That is the same tank with the right sized filter on it the next day. I think the cories liked it better too.
The 45 long ended up with a breeding colony of Ameca Splendens and the 20H got some Corydoras Hastatus. I ended up getting another 20H at auction and filled it with the Xiphophorus Helleri that had spent the summer outside in a tub type pond.
This is a picture of an earlier design using the same basic approach. At that time I was building a stand for my 45 over my 40 breeder that needed to look like furniture in a more public location, the family room.

I started by cutting the top and bottom shelf frames to size. The size is the largest that I would want in terms of a tank plus enough extra that I can slide a tank in and out with no trouble. In my case I was designing for a 4 foot long nominal size tank so I made the top shelf 4 ft 6 inches long. Front to back the tank measures 12.5 inches but I wanted it to be ready for a 90 gallon that is 18 inches front to back. I made the shelf 19 inches total front to back but the frame sits under it completely so the bottom shelf needed to be smaller. The bottom shelf is only 4 ft 4 1/2 inches long and 17 inches front to back. That allows it to sit inside the legs that support the top shelf.
The bottom shelf frame is similar but I made the inner brace toward the back instead of toward the front of the shelf. If I put a small tank on the bottom shelf, I want the back edge supported so the inner brace goes where the back of that tank would be. If I put a smaller tank on the top shelf it sits toward the back so the inner brace goes toward the front to support the front edge.
Also shown in this drawing is the location of the 2 by 2 inner legs that actually support the weight of the top tanks.
Start by deciding how big to make the stand and then develop your materials list. I have found that in general the nominal 1 inch thick wood is plenty for a typical stand if you take the trouble to use 2 pieces at right angles at each corner. These pieces serve 2 purposes. The first is to brace the inner legs so that they will stay where they are intended to be, supporting the top frame. The second is to prevent the stand racking.
Racking is a term that refers to what happens when you have a square or rectangular object and grab opposite corners and squeeze them in to distort the squareness. You end up with a parallelogram right before the whole thing fails. In a tank stand it is what will happen if the legs are not vertical or are not braced to prevent it. The weight on the top shelf will gradually bend the legs further and further away from the vertical until the strength of the things you have used is exceeded, at which time it will fail completely in a second or less. The water cleanup alone makes bracing against the motion worth doing well.
I made the bottom frame from 6 inch wide boards because my experience with lower shelves told me that too close to the floor was a bad idea. I never want to use legs to provide the support at the floor itself so my only way to raise that shelf was using 6 inch boards instead of 4 inch. The top frame was made with 4 inch lumber because it was strong enough and it let me have more room between shelves without having the top shelf too high.
OK time for some real world pictures instead of drawings. I laid out the cut pieces where the stand was destined to go so that I could make sure it would fit as expected and I wouldn’t need to carry the assembled stand too far. First step was to check the floor for level and get ready to trim the bottom boards to level the stand. Because the bottom frame rests directly on the floor, there is no way to adjust a leg to level it later. If I ever move to a new house, I will need to disassemble the bottom frame and trim it to fit the new home. That’s another good reason to use 6 inch wide lumber for the bottom frame.
Next step was to trim the boards that make up the bottom frame so that when assembled, everything would be level. I was surprised to find how far out of level the floor was. This is a relatively modern house that seems to be well built but apparently level floors was not a major focus for the builder.
Next up was assembling the top shelf. The picture also shows the cut pieces for the bottom frame and some of the inner legs.
The legs are assembled from 3 pieces each. They have a 1 by 6 and a 1 by 3 wrapped around a 2 by 2. Since the 1 inch lumber goes from almost the floor to just under the top shelf it is longer than the 2 inch lumber that is pinched between the top frame and the bottom shelf. This leg is shown with the notch for the bottom shelf on the left and the notch for the top frame on the right. If I did it again, I would cut the outer leg braces to custom lengths so that all of them would look the same distance from the floor when the stand was done.
The joint between the 2 pieces of 1 inch lumber are made stronger by fitting them to each other as shown here. Note: The legs on the right and on the left are not the same as each other, they are mirror copies of each other. The front and back legs on a side are identical to these but of course that means they wrap the frame differently.
Next step was to put the surface boards onto the bottom shelf. This gives the legs a place to rest on the bottom since they do not quite reach the floor. Shelf material is shown in place. I usually use ¾ inch plywood to top this basic design. On this one I used 1 inch thick boards, actually ¾ inch, because I realized that if I used plywood I would need a full sheet and about half of it would have been waste material. If you look closely you can tell that the bottom frame gets shorter from left to right. The floor was actually that far out. You can see legs standing around and the top frame is visible at the far right of the picture.
Once I had the pieces of the frame built it was time to do a dry fit of the parts and make sure everything was going to fit and both shelves would be level. This picture is not really in sequence but shows what the stand looks like when the legs are attached to the bottom frame and then what it looks like once fully assembled. You can see in the fully assembled picture how far the legs are off the floor. The width of the outer legs lets me space the screws far enough apart that racking is prevented. It is sort of like having a short diagonal brace.
In reality, I fully assembled the stand and checked for fit, then removed the top shelf and frame to make painting easier. I had no desire to crawl around on the bottom shelf trying to paint the bottom of the top shelf.
The color was my choice and would probably suit nobody else but I wanted it dark and easy to keep clean. This is what it looked like after the first coat of paint and then after being reassembled.
This is the stand finally painted and in its final home with a 45 gallon long on it. The back edge of the 45 is sitting right above the “inner brace” of the bottom frame so its weight is carried directly by the floor. It is as if I had set the tank directly on the floor and leveled it with solid shims.
After the paint dried I pulled the shims out and let the bottom frame down onto the floor instead of resting above it on wood strips to avoid marring the flooring. Picture looks almost the same except for the small strips spacing it off the floor in the first picture.
A sample of what it might look like with 2 smaller tanks on the top shelf. The one on the left is a 10 and the one on the right is a 20 tall. I just did it to get an idea of how I was doing. The 10 has its own metal stand.
Tried a setup where I used sand with a large power head and a sponge filter on the 20H but the sand would not settle properly. You can see the “beach erosion” and sand dunes that it was building.
Thankfully I had another filter cycled and ready to go so I swapped them. That is the same tank with the right sized filter on it the next day. I think the cories liked it better too.
The 45 long ended up with a breeding colony of Ameca Splendens and the 20H got some Corydoras Hastatus. I ended up getting another 20H at auction and filled it with the Xiphophorus Helleri that had spent the summer outside in a tub type pond.
This is a picture of an earlier design using the same basic approach. At that time I was building a stand for my 45 over my 40 breeder that needed to look like furniture in a more public location, the family room.
")