Donya's 55-Gallon
- Thread starter Donya
- Start date
These nems are just your standard Entacmaea quadricolor bubble tip anemone, although from a captive strain. Wild caught E. quadricolor are usually much more fragile than captive-split specimens for whatever reason, so it's always better to get captive ones even though they can cost a bit more and can be harder to find. Similarly, attached anemones fare better, so never ask for one to be removed from a rock (better for the nem's survival to just buy the rock too). Most captive-propagated nems I've seen for sale have actually arrived at the stores on small pieces of rock already. Obviously if they're on the glass it's another matter, but it's a lot easier/safer to remove one from the glass than a rough surface like a rock.
Strains within this species are a funny thing from what I've seen and discussed with other hobbyists. Some bubble a lot, some won't. I've seen mine bubble when regularly poked at (i.e. when hosted by a clown), but otherwise they un-bubble. Mine are also very food-oriented. The food attitude seems to have little to do with lighting; they will often prefer to sit under a ledge in the shadows if it gets them food more easily. If I forget to feed them for a few days or have had to go out of town for a while, they get sticky to the point where it's hard to get them off my hand if they snag it and it can leave a red mark too. On the other hand, other BTAs I've seen and heard about may not even accept food and aren't sticky at all. Perhaps not surprisingly, those anemones are also often the ones that prefer bright lighting and might even bleach and fail in the sort of lower-end lighting under which mine are thriving. There is a lot of variability, which is part of what makes them tricky animals.
Strains within this species are a funny thing from what I've seen and discussed with other hobbyists. Some bubble a lot, some won't. I've seen mine bubble when regularly poked at (i.e. when hosted by a clown), but otherwise they un-bubble. Mine are also very food-oriented. The food attitude seems to have little to do with lighting; they will often prefer to sit under a ledge in the shadows if it gets them food more easily. If I forget to feed them for a few days or have had to go out of town for a while, they get sticky to the point where it's hard to get them off my hand if they snag it and it can leave a red mark too. On the other hand, other BTAs I've seen and heard about may not even accept food and aren't sticky at all. Perhaps not surprisingly, those anemones are also often the ones that prefer bright lighting and might even bleach and fail in the sort of lower-end lighting under which mine are thriving. There is a lot of variability, which is part of what makes them tricky animals.
Too many BTAs. Too many sneaking little blobs of mischief running around the tank in strange places. Some are getting the boot right now and drip acclimating to another tank where I just upgraded the lighting. The last time I booted one out, I had to move it straight back to repurpose the tank as a hospital setup for a damaged coral, but that won't be happening this time, since a BTA growout tank is pretty seriously needed at this point.
I also just saw something bizarre to do with that mysterious pinkish purple tree coral I've got. It EATS. I have had it for ages now and never observed this before. I saw it clearly though on a frag from it today: polyps grabbed and swallowed a bunch of tiny food pellets that I spilled over the frag by accident. The frag's polyps also grabbed a lot of pellets that were too big to eat, so the particle size needs to be quite small for successful feeding, almost like the dust you get at the bottom of a jar of pellets rather than the pellets themselves even for "micro" size pellets. I guess this explains part of why I've had trouble getting frags of this coral going well in other tanks until now...probably was missing the correct particle size range for it. The 55gal with the parent colony gets the broadest spectrum of foods of any of the tanks I've got.
I also just saw something bizarre to do with that mysterious pinkish purple tree coral I've got. It EATS. I have had it for ages now and never observed this before. I saw it clearly though on a frag from it today: polyps grabbed and swallowed a bunch of tiny food pellets that I spilled over the frag by accident. The frag's polyps also grabbed a lot of pellets that were too big to eat, so the particle size needs to be quite small for successful feeding, almost like the dust you get at the bottom of a jar of pellets rather than the pellets themselves even for "micro" size pellets. I guess this explains part of why I've had trouble getting frags of this coral going well in other tanks until now...probably was missing the correct particle size range for it. The 55gal with the parent colony gets the broadest spectrum of foods of any of the tanks I've got.
I went to the annual frag farmer's market over the weekend and picked up some new zoas for this tank along with some other softie frags that are currently growing out in a 20gal. I decided on growing the rest out for a bit first since everything I got except for the zoas are in a size range that makes them super stylish hats for the sea urchins in the 55gal.The growout tank also has the numerous frags from my tree coral growing out nicely now that I've figured out that the darned things eat stuff. I wedged them down onto frag plugs with bits of plastic (too narrow to pin through the middle really) and they have grown bases over the plastic now. They'll be ready for trading soon.
The yearly frag market has a raffle for tons of stuff each time that has been donated by various companies. I bought a load of tickets this year to make up for the fact that I didn't do it last year, since the proceeds go to support work with corals at the school that hosts the event. Much to my surprise, I won some stuff! I've now got a giant protein skimmer and a really cool refugium kit for a sump. I think I've already got something that can be used as a return pump, although I need to get an overflow and then decide what I'm going to do for the sump container itself. The container part is a choice between going for a plastic bin as soon as I can shuffle things around in the room or waiting a bit longer to either build or acquire something more standard. Anyway, it looks like my 55gal will be getting sumped after all! Really looking forward to seeing what I happens with the 'fuge kit.
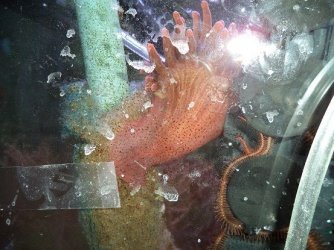
Also, back on the anemone topic, a BTA clone has taken up residence on the prefilter for one of my canister filters. The anemone absolutely fine and I have no worries about it being there (I will just peel it off and put it in another tank when I change the prefilter), but it drives home the point of why one needs to be careful about protecting intakes and impellers in tanks with anemones.
Just finished cleaning a spare 20gal which will soon start its conversion to a refugium:
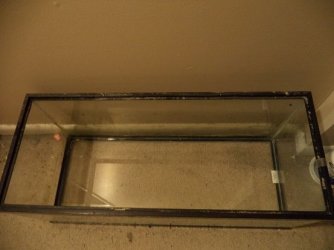
I will need to get the refugium started up and running for a while by itself before connecting it to the tank, since it sill probably be mucky in there at the start while the rock and substrate is sorting itself out. There is also still quite a bit of stuff I still need to get:
- An overflow and tubing into the sump.
- Tubing for the return.
- A small light. I thought I had an old LED fixture that would work, but it seems to be dead now! Oh well.
- Possibly a different return pump...I'm having second thoughts about the old one I've got since it looks like I would need to either have a really high gph overflow or throttle the output of the pump.
Also, here is that BTA that went on the intake. Sorry for the awful pic, but it's around the side in a place where I can't clean very well.

New stuff I've gotten:
- Eshopps PF300 overflow
- Danner mag drive supreme 3 return pump
Other new stuff required to make the above stuff work:
- Eshopps directional return (didn't feel like going DIY with that...too much bother)
- 10ft of 1/2" clear vinyl tubing (for return). I'll probably use ~5ft.
- 10ft of 1" black corrugated pond tubing (for overflow).
- hose clamp for the bigger tubing
- barbed adapter for the return pump to connect the tubing
- 3/4" PVC insert to fit snugly inside the 1" bulkhead on the PF300
- 1" PVC barb adapter to fit over the other PVC insert
- Silicone sealant for the inside of one of the joints
What I have to do:
- Seal and epoxy the PVC bits and overflow together
- Hook up the hoses
- Wet test the sump with water only to make sure I haven't planned this all insanely badly. I'll then turn off the return pump and get the 'fuge going if it all works smoothly.
Things I have that I guess I'm going to have to either store for possible other uses or return:
- 6ft of corrugated tubing that looked safe until I unpacked it and saw a nasty little warning taped to it (that sticker was covered up at the time of purchase).
- A PVC adapter that was meant to go with the unsafe tubing but now is useless since I'm not using the tubing.
All in all not bad. I'm only out a couple dollars on the parts that were bad. Most expensive things were obviously the overflow, return pump, and surprisingly the pond-safe tubing was a little pricey (a little over $2/ft) but I would rather be safe than sorry with the tubing after the nasty surprise sticker on the first batch. Also, for anyone who reads this and happens to be planning a sump too: make sure you take any parts you already have to the hardware store and test them with any new parts you want to get. I found quite a few parts in the bins that almost but not quite fit due to irregularity between the individual pieces, and fitting well was important since I'm not set up to grind down things that don't fit due to being a hair too big.
So far I've wet-tested the sump with a few inches of water. Flow rates seem good and everything, but I was not impressed with the whole priming method for getting the siphon started. The typical method is to stick a bit of airline up it and suck the air out...which, in the absence of a squeezy pump of the right size, is often done by mouth. Not having such a pump, I did it the yuck way for the test out of impatience, but I'll be getting an automatic fluid/air pump next week to do that job and also to act as insurance against bubbles being sucked in, since that happened rather a lot during the short test I did.
Sump in action.
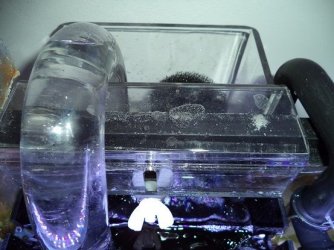 <-- note the bubble...boo!
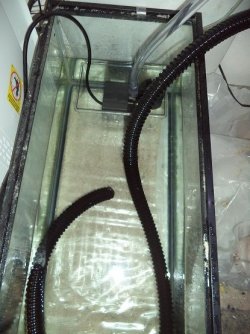 <-- note container near the top
The bubble in the u-tube forms over a period of a few minutes from sucking in bubbles. It then seems to remain a constant size with small bubbles being sucked away at the rate they're added, but I still don't trust it enough to let everything run unattended. Hopefully it will look more trustworthy once that fluid pump arrives.
EDIT: oops, forgot to say that the extra container is there as a safeguard against overflowing in the event of a siphon break. Various arrangements of baffles in more sophisticated sumps would normally accomplish that, but obviously there are none here.
 <-- note the bubble...boo!
  <-- note container near the top
The bubble in the u-tube forms over a period of a few minutes from sucking in bubbles. It then seems to remain a constant size with small bubbles being sucked away at the rate they're added, but I still don't trust it enough to let everything run unattended. Hopefully it will look more trustworthy once that fluid pump arrives.
EDIT: oops, forgot to say that the extra container is there as a safeguard against overflowing in the event of a siphon break. Various arrangements of baffles in more sophisticated sumps would normally accomplish that, but obviously there are none here.
I've just realized that I've got a lovely filter sock for the output and nothing to actually attach it to...brilliant planning lol. It wasn't something I needed for testing the drain/pump behavior so it slipped my mind. I guess that can wait a bit while the sump gets going. Debris probably won't accumulate too fast over during however long it takes me to get an attachment to hold the sock in place.
Sumps can be fiddly things to get set up and functioning nicely when the tank isn't drilled (drilled tanks have fewer potential points of failure in the path the water has to take). I was also surprised when I was looking for simpler options that there don't seem to be any reasonably-priced plug-n-play sump designs that just come with all of the correctly-sized PVC attachments, safe tubing, and whatever else.
sawickib said:Gosh that all looks very complicated
Sumps can be fiddly things to get set up and functioning nicely when the tank isn't drilled (drilled tanks have fewer potential points of failure in the path the water has to take). I was also surprised when I was looking for simpler options that there don't seem to be any reasonably-priced plug-n-play sump designs that just come with all of the correctly-sized PVC attachments, safe tubing, and whatever else.
Got the fluid pump today and hooked it up to the overflow. If the siphon is broken and the return pump is started, the fluid pump is able to successfully prime the siphon very quickly. It also keeps bubbles out of the U-tube. This is what it looks like currently (obviously I'll need to trim the airline later):
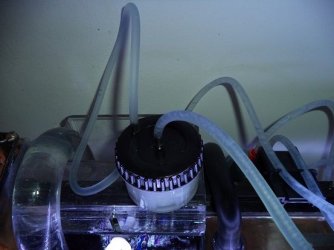
The round thing in the middle isn't the pump, but rather a prefilter to stop the pump from silting up with debris. The pump is hanging off to the right and isn't too visible except for one of the red connectors. So far everything seems trustworthy now. The fluid pump has stopped bubble accumulation while the siphon is flowing. If the power goes out, the siphon should remain in-tact, so the whole thing can just start back up again smoothly. And, if the siphon is broken during that somehow, the fluid pump will just prime the siphon again right away when the power comes back on. And, finally, if it all goes bad in an unlikely event and the fluid pump gives out AND the siphon breaks, the return pump will run dry before it can overflow the tank (better to have to replace a pump than have the room flooded).
And...I have done a makeshift filter sock holder. The top is just above the waterline but well below the tank rim in case it clogs up and causes the water to come out the top.
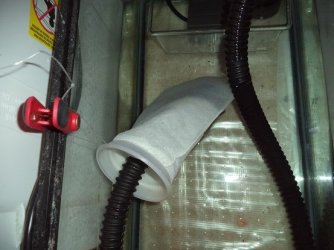

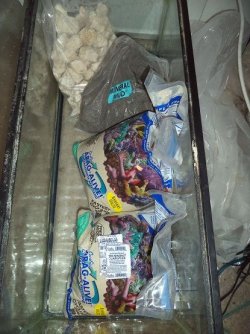
Most of the 'fuge kit is in now. I turned off the return pump and small fluid pump for this part to keep the main tank clean, so I dropped in a spare powerhead for circulation (barely visible poking out on the left of the pic). I also haven't put the special mud stuff in yet since I need to mix it into the sand and wanted stuff to clear up first to be able to see what I'm doing. Might be too much rubble...I'll have to take some out to mix the mud, but maybe it can go back in after that.
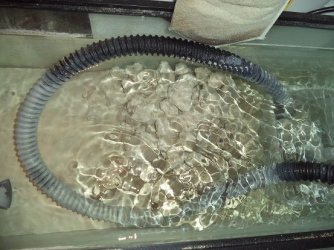
I saw the water was crystal clear this morning and absentmindedly thought: "oh, I guess I can turn the pumps back on until I put the mud in." Fortunately, as I was reaching for the plug, I remembered something important: all that sand was live, not dry. Although the expiration date on the live sand wasn't until 2015, it had still been sitting there for a few months while I got my crud together with the rest of the sump, and that can't have been super for it. So, I realized it would be best to check and see what the sand bugs had been up to overnight before risking connecting the sump again. And indeed, the live stuff had done something: a MASSIVE nitrite spike. It would have been interesting to see whether that spike actually formed overnight or if it was the ambient level in the bag. Ammonia tests read zero and pH was good, around 8.4 or so.

I saw the water was crystal clear this morning and absentmindedly thought: "oh, I guess I can turn the pumps back on until I put the mud in." Fortunately, as I was reaching for the plug, I remembered something important: all that sand was live, not dry. Although the expiration date on the live sand wasn't until 2015, it had still been sitting there for a few months while I got my crud together with the rest of the sump, and that can't have been super for it. So, I realized it would be best to check and see what the sand bugs had been up to overnight before risking connecting the sump again. And indeed, the live stuff had done something: a MASSIVE nitrite spike. It would have been interesting to see whether that spike actually formed overnight or if it was the ambient level in the bag. Ammonia tests read zero and pH was good, around 8.4 or so.
Similar threads
- Replies
- 5
- Views
- 233
- Replies
- 9
- Views
- 245
- Replies
- 6
- Views
- 287
- Replies
- 8
- Views
- 331


