Diy Project

Chug

Fish Fanatic
Joined
Aug 26, 2011
Messages
64
Reaction score
0
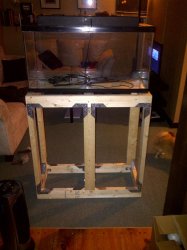
I have decided to start a DIY build for a 39 gallon tank i have managed to save from a person that was gong to throw it out. First was the cleaning of the tank. A few hours of elbow greese and it looks like new, no scratches in the glass, all the white water marks are off the black portions. I filled it and let it sit over night....NO leaks... we are in business..

The plan for this build is to use as much home made stuff as i can. I have decided to use play sand for the base in this tank. Added will be a large piece of Malaysian Drift wood (NEW).

The first project was to make my own coconut caves. They turned out great, pictures to follow.

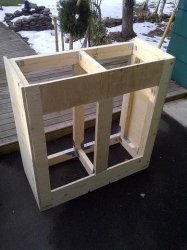
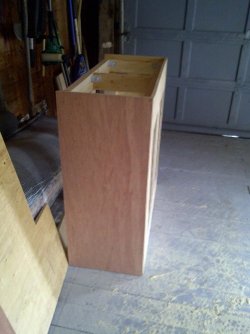
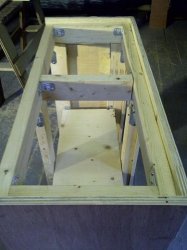
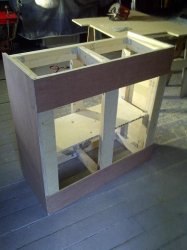
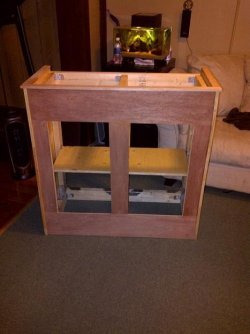
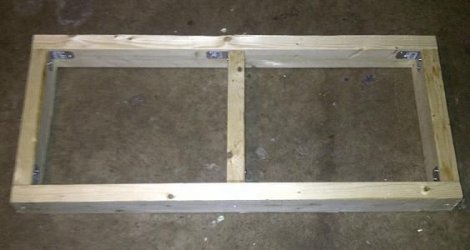
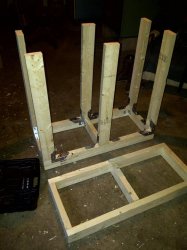
I have now started to build my own tank stand. Pictures will be added as i build. Started last night, will add photos when i get home from work.

Any suggestions or tips for good DIY tank decorations , ect?

also in regards to the tank itself, i will be adding a new filter. Suggestions for the best filter for this tank..?? its 36x18x12. and also, it will be a tropical tank, so i will be adding a heater as well.
 
Get an external filter, there are many brands to choose from. I like Eheim filters. As for decoration, I would use stone, a lot more natural.
 
dont skimp on making the stand, whatever you do. if you've think youve got it strong enough, you're about half way there :lol:

also when i got my tank out of the attic after using it as a vivarium for 8 years, i left water in it for nearly a week in the garden to check it was strong.
 
Please keep in mind i am by know means a carpenter. this is very much a learn as i go project. I went a little overboard on the metal support. This thing will never budge.

I made two of these, one for the base, and one for the top. It measures, 37' long, 13" wide, and 35' tall.

This is with the middle support section added . as well as the top, yet to be attached

and with the top attached

The next step will be to incase the whole thing in oak or maple, then stain to a dark walnut finish. A bottom will be added to serve as a shelf. Still unsure if i will add doors, or just leave the front open.

Again i am no carpenter and learning as i go. any and all suggestions would be great. Thanks guys and gals :)
 

Attachments

  • Bottom.jpg
    Bottom.jpg
    32.3 KB · Views: 73
  • legs.jpg
    legs.jpg
    64.2 KB · Views: 75
  • front.jpg
    front.jpg
    81.8 KB · Views: 91
Looks to be a thorough job! Stand looks strong, but i do have a little pointer;

Its looks like from a compression point of view (weight bearing down on top) it would be perfect, but a knock to the side, might see it collapse with a full tanks weight on top. Could perhaps do with a 45' brace across the back to stop sideways movement. Only mention this as the joints are not interlapped.

Those metal bracers stop the sideways movements and i've used them before myself, that stand wont budge. Nice work work mate, should do the job nicely. Lots of space for a decent filter below too. A big sheet of ply on the back with the filter pipe holes cut in will strengthen it even more and nullify any possible sideways movement Mowbz mentioned :D
 
i will be placing maple around the whole stand. It was built with a 1.5" gap in the back for all cords ect
 
Admins, maybe this post can be moved to the Do it Yourself section. Never even seen that fourm avaiable, lol. My bad, lol
thanks
 
Looks to be a thorough job! Stand looks strong, but i do have a little pointer;

Its looks like from a compression point of view (weight bearing down on top) it would be perfect, but a knock to the side, might see it collapse with a full tanks weight on top. Could perhaps do with a 45' brace across the back to stop sideways movement. Only mention this as the joints are not interlapped.

Those metal bracers stop the sideways movements and i've used them before myself, that stand wont budge. Nice work work mate, should do the job nicely. Lots of space for a decent filter below too. A big sheet of ply on the back with the filter pipe holes cut in will strengthen it even more and nullify any possible sideways movement Mowbz mentioned :D


i will be placing maple around the whole stand. It was built with a 1.5" gap in the back for all cords ect


Maple around the whole thing would have been enough anyways :) I was reading it and just had terrible visions of the whole thing going over, which would be a serious shame given the effort and craftmanship so far!! As the Pokemon kitten says, banging job. Cant wait to se the finished results. :)
 
Great job, does anyone know of somewhere in the UK that stocks the brackets used? Cheers
 
Great job, does anyone know of somewhere in the UK that stocks the brackets used? Cheers


Most building supply places sell them. Try places like travis perkins and other builders merchants. Various examples online, a quick google gave these guys:

http://www.raygrahams.com/catalog/index.php?cPath=4321_4078&osCsid=7a490eaan1r185b57e7421h8l7
 
Ok, so I finally got around to working on the stand again. Here is the end result so far

the side with the oak finish over top of the plywood

Shelf i added to hold the filter

The front with the oak finish being added

front oak

and the finished product inside the house
 

Attachments

  • facing.jpg
    facing.jpg
    41.5 KB · Views: 76
  • side complete.jpg
    side complete.jpg
    98.1 KB · Views: 61
  • shelf.jpg
    shelf.jpg
    29.9 KB · Views: 70
  • front.jpg
    front.jpg
    81.8 KB · Views: 66
  • front complete.jpg
    front complete.jpg
    28.8 KB · Views: 67
  • finished inside.jpg
    finished inside.jpg
    38.8 KB · Views: 62
I would add a back and some doors but it's all up to you. I'm no carpenter either so I feel you.

All in all it looks really nice. I may do something like this for my 5 gallon hex that im getting.
 
Doors, a back, a floor and a stain will be added next!
 

Most reactions

Back
Top