HappyGeorge
Fish Herder
Basic Photography Guide
Part 2
Ok so hopefully people have dusted off their cameras and are ready to start playing. I am going to run through the general functions of a camera and what you really need to have some kind of working knowledge of in order to create the image that you want.
Much of this has been covered elsewhere but hopefully I can explain it all too you in an understandable format. With everything I explain I am leaving out stuff I don’t think is important if you want to know Google it and bask in the information overload. For example ISO (International Standard Organisation) you don’t need to know the history of it, just how it works and what effect it has in a digital camera.
Standing and Holding
The first thing we need to do is stand correctly and hold the camera correctly, often underestimated but it will make an awful lot of difference in certain situations.
To start the stance is a bit like a fighting stance, one foot further forward and feet shoulder width apart, that way you eliminate sway from your body effecting the stability and causing blur. If you’re really having problems then you can always wrap your arms round an immovable object (lamppost, pole dancing pole, stuffed elephant).
By choice for many photos it is preferable to use a tripod especially when it comes to Macro photography.
The way you hold the camera also adds to the stablility with an SLR or Prosumer/Bridge camera you want one hand over the shutter end of the camera and the 2nd hand underneath the lens, this is especially important if you are focusing manually but it should become 2nd nature to hold it like that (and is a dead giveaway of photographic nowse).
If your using a compact camera, you need to hold it securely without obscuring the lens and I would always promote using an eye piece rather than the screen. If you do use the screen and hold your arms out towards the subject, it promotes wobble on the camera, it is much easier to hold something steady if you keep it close to your body, so use the view finder turn the screen off, take better pictures and save your battery life. It will also result in less blurred photos as the screen will often appear sharp when it is actually out of focus very slightly.
The Three elements of a balanced photograph
To successfully capture an image that is of the correct exposure i.e not too light or too dark and not blurred or grainy (speckally and low quality) we need to balance 3 things these being ISO, Shutter Speed and Aperture.
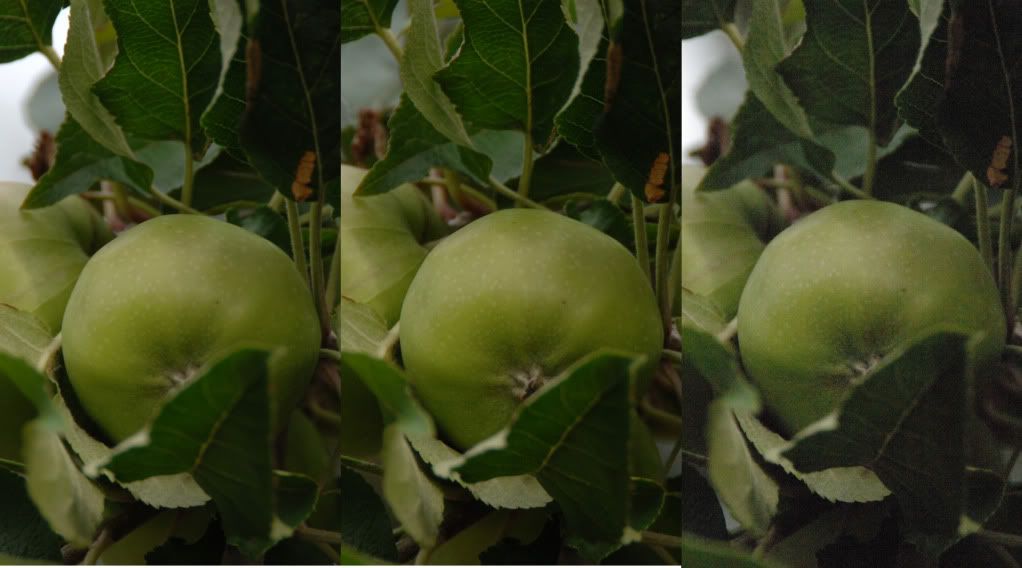
ISO – Altering the ISO will change the quality of the image a setting of 400 is a good starting point. If you are somewhere with low light and a flash isn’t suitable you can raise the ISO number, this will have the effect of making the image more grainy but may still be of good enough quality for your purposes. in this image I have taken 3 shots the far left was taken with the ISO set at 100, the middle at 400 and the last one on a setting Nikon call High-2, you will notice a little difference between first and second but the last is very poor, all the pics were taken at the same aperture.
Shutter Speed – This refers to the speed at which the shutter opens and closes and hence the amount of time that light is allowed to enter the camera for and is expressed as seconds or fractions of a second 1/250th, 1/500th etc. When we get to Macro and using a tripod we may get to using tenths or even whole seconds but you would never be able to handhold a camera to less than about 1/60th of a second without resulting in a blurred photo.
How low you can go will be down to how steady a hand you have and most compact cameras by default will normally be about 1/300th, I know with my camera I can get a shot at 1/60th but you may find your limits are less or greater than mine. There will be a mode on your camera for selecting the shutter speed manually via the mode dial or menu (normally called S or TV mode) this will enable you to select the shutter speed whilst the camera adjusts the aperture automatically to produce a photograph of the right exposure.
Alternatively you can select fully manual (normally M on the mode dial or menu and available on most prosumers and compacts) and then adjust shutter speed and aperture and use the light meter on the camera to balance the two.
Aperture – This setting will determine the size of the ring allowing light into the camera, in SLRs this is built into the lens itself. The easiest way to explain this is with a diagram.
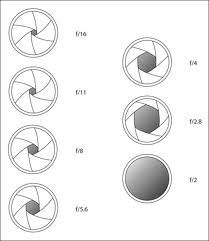
You will note that the bigger the aperture the more light will enter the camera but the lower the F number (Focal Ratio) I mention this because it takes a while for people to get their heads round the higher number less light issue, this is a standard measurement across all cameras but the range will vary between cameras and lenses, and in photographing your tanks changing the aperture manually will be essential.
So find out how to select the aperture manually, in many cameras you will be able to switch modes on a mode dial or via the menu to select aperture priority (normally called mode A or Av). The camera will then automatically select the correct shutter speed to produce a photograph of the correct exposure or you as with shutter speed balance both elements yourself using the fully manual setting and the light meter.
Balancing the Elements
Once you have set the ISO setting it shouldn’t require much changing. The main balancing act is between Shutter Speed and Aperture to produce a sharp, correctly exposed image. It may seem that we can just select the lowest possible F number and thus allow the most amount of light into the camera and then let the camera select the highest possible shutter speed, reducing the chance of movement causing blur, but changing the aperture has a 2nd effect which is to change the amount of the picture which is in focus (depth of field).
Depth of Field
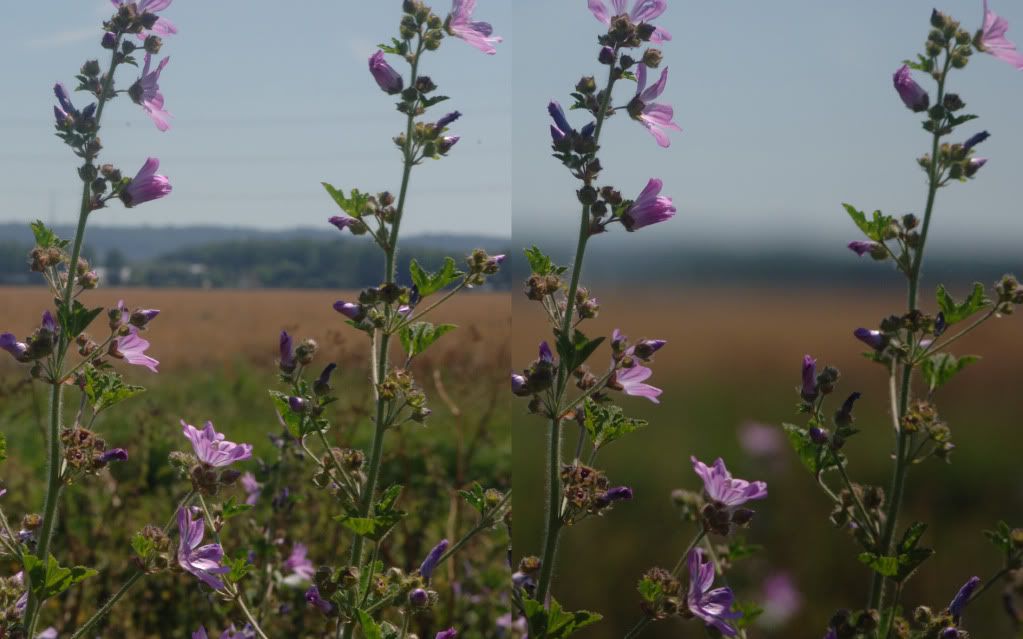
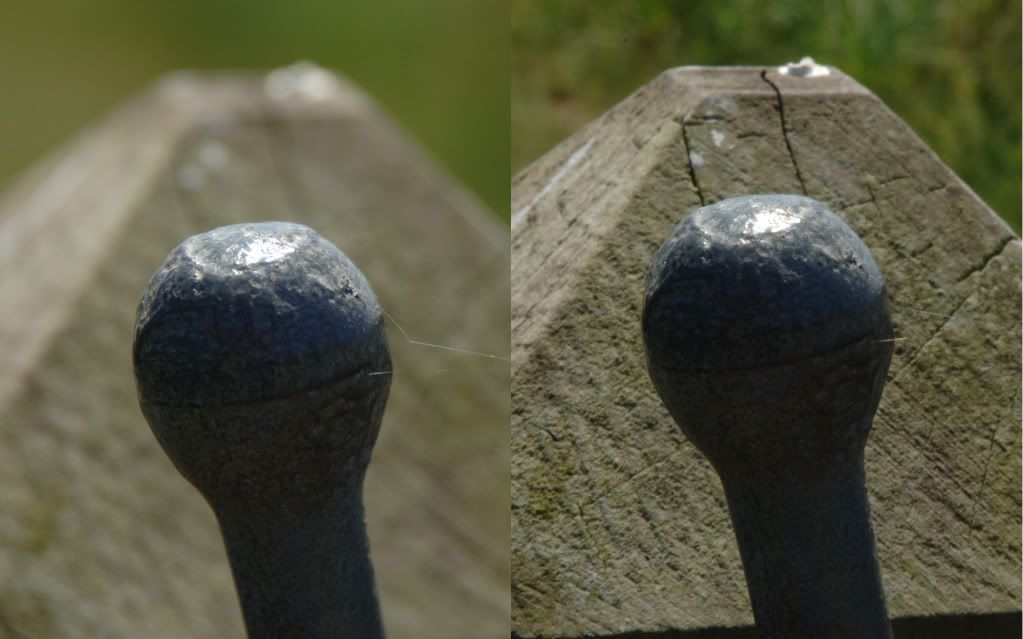
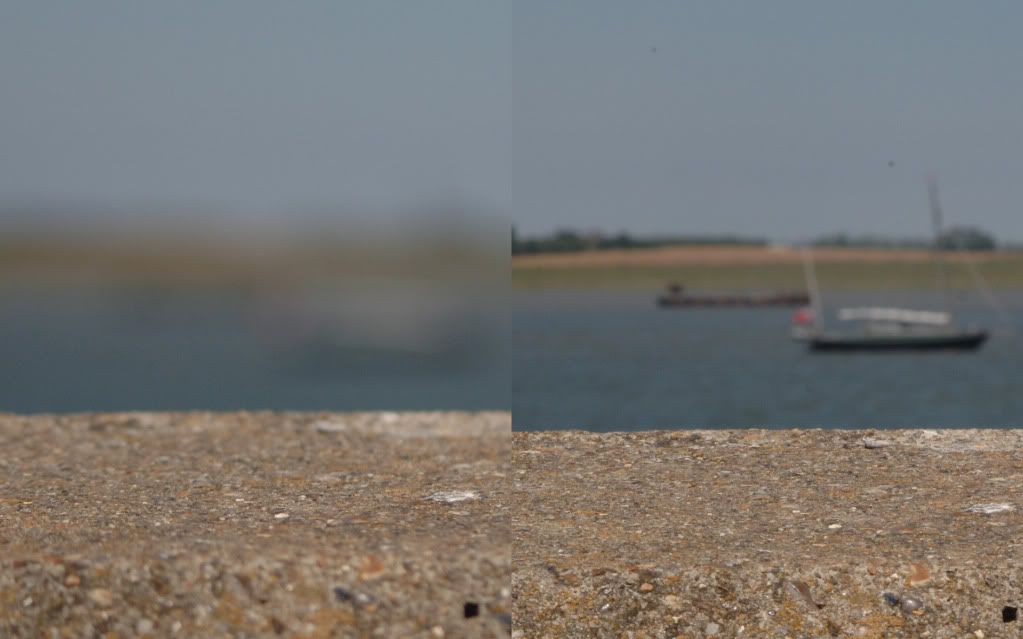
This is one of the most essential elements especially when it comes to Macro photography. If you select a very low F number to allow a lot of light into the camera this has the effect of reducing the amount of a photo that is in focus, this is referred to as depth of field. I have taken some shots to specifically illustrate this below
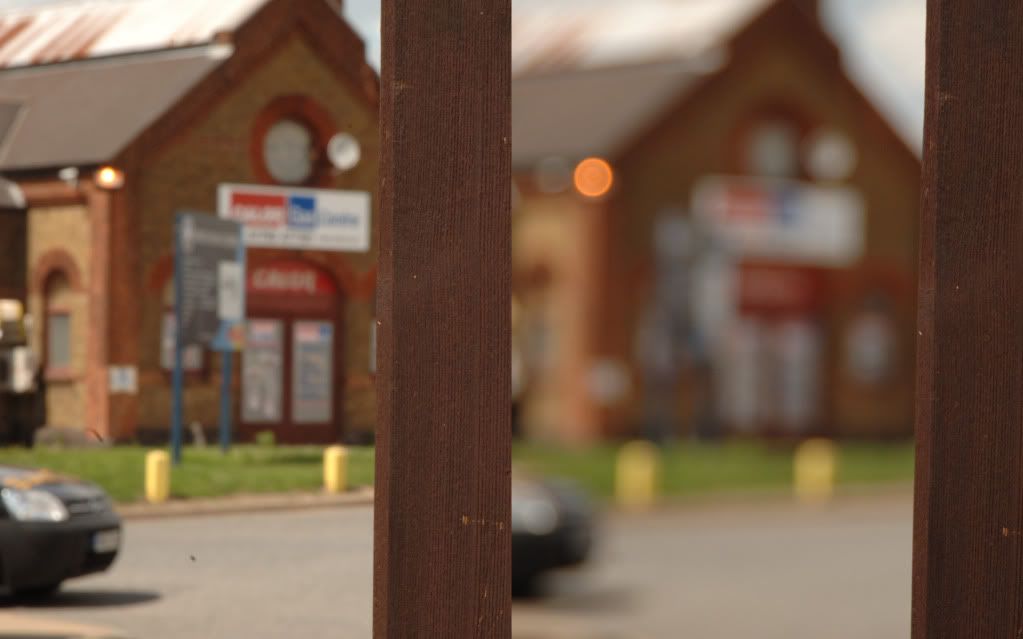
Both of the above photos help to give a sense of distance and is a useful technique when photographing landscapes and structures, it both gives a sense of distance and a reference point and to draws the eye into a picture.
The following ones show firstly how the attention of the eye changes as you suddenly notice the spiders web in the first one on the out of focus shot which demonstrates how you can draw the eye to one point of the photograph. In the other you will see the depth of field is so narrow even parts of the wall in the foreground are slightly out of focus. All of these were taken at the same ISO setting and with the camera taking care of the shutter speed, all I did was alter the Aperture (A or Av mode).
The effect of changing it in Macro is greatly increased and you will understand why some close up tank photos have only one tiny area of the photo that are in focus.
Focusing
We may also need to override the automatic focusing on an SLR focusing is controlled manually by adjusting a ring at the base of the lens. On a compact there is normally little or no manual focusing option and on Prosumer cameras it normally has to be selected via the menu. Not being able to focus manually means that you normally have to wait for the camera to double check the focusing and have a bit of thinking time between you pressing the button to take the photo and it actually taking it, we will come back to ways to overcome this next week.
This weeks task if you want to join in
1) Go and play with the aperture settings of the camera take two shots one at the lowest and one at the highest and focusing on the same thing in each one, either the furthest or the closest and see what the range of your camera is, it may not be as distinct as the photos I showed here but it will show you how a shot can be altered by changing the depth of field. Post results on this link.
2) Work out how low you can go with your cameras shutter speed and still get a photograph that is in focus.
3) Take a photo with your camera at the lowest ISO setting and then at the highest and post them here. Take the two shots of the same thing and do it outside in daylight on a bright day otherwise you won’t be able to get a shot at the highest setting and see the difference in image quality.
No editing and no need to be arty it’s just an exercise to get you understanding the effect changing these settings has on your pics.
Remember to post your pics and questions HERE, and if something wasn't clear then please ask me to explain again either by pm or on the responses topic.
Next week I will start with a fault finding guide to work out why your shots may not turn out as you would wish and we will cover Set up of Marine and surrounding area, focusing technique, Macro, White Balance and Flash use. Then shot composition and editing.
Part 2
Ok so hopefully people have dusted off their cameras and are ready to start playing. I am going to run through the general functions of a camera and what you really need to have some kind of working knowledge of in order to create the image that you want.
Much of this has been covered elsewhere but hopefully I can explain it all too you in an understandable format. With everything I explain I am leaving out stuff I don’t think is important if you want to know Google it and bask in the information overload. For example ISO (International Standard Organisation) you don’t need to know the history of it, just how it works and what effect it has in a digital camera.
Standing and Holding
The first thing we need to do is stand correctly and hold the camera correctly, often underestimated but it will make an awful lot of difference in certain situations.
To start the stance is a bit like a fighting stance, one foot further forward and feet shoulder width apart, that way you eliminate sway from your body effecting the stability and causing blur. If you’re really having problems then you can always wrap your arms round an immovable object (lamppost, pole dancing pole, stuffed elephant).
By choice for many photos it is preferable to use a tripod especially when it comes to Macro photography.
The way you hold the camera also adds to the stablility with an SLR or Prosumer/Bridge camera you want one hand over the shutter end of the camera and the 2nd hand underneath the lens, this is especially important if you are focusing manually but it should become 2nd nature to hold it like that (and is a dead giveaway of photographic nowse).
If your using a compact camera, you need to hold it securely without obscuring the lens and I would always promote using an eye piece rather than the screen. If you do use the screen and hold your arms out towards the subject, it promotes wobble on the camera, it is much easier to hold something steady if you keep it close to your body, so use the view finder turn the screen off, take better pictures and save your battery life. It will also result in less blurred photos as the screen will often appear sharp when it is actually out of focus very slightly.
The Three elements of a balanced photograph
To successfully capture an image that is of the correct exposure i.e not too light or too dark and not blurred or grainy (speckally and low quality) we need to balance 3 things these being ISO, Shutter Speed and Aperture.
ISO – Altering the ISO will change the quality of the image a setting of 400 is a good starting point. If you are somewhere with low light and a flash isn’t suitable you can raise the ISO number, this will have the effect of making the image more grainy but may still be of good enough quality for your purposes. in this image I have taken 3 shots the far left was taken with the ISO set at 100, the middle at 400 and the last one on a setting Nikon call High-2, you will notice a little difference between first and second but the last is very poor, all the pics were taken at the same aperture.

Shutter Speed – This refers to the speed at which the shutter opens and closes and hence the amount of time that light is allowed to enter the camera for and is expressed as seconds or fractions of a second 1/250th, 1/500th etc. When we get to Macro and using a tripod we may get to using tenths or even whole seconds but you would never be able to handhold a camera to less than about 1/60th of a second without resulting in a blurred photo.
How low you can go will be down to how steady a hand you have and most compact cameras by default will normally be about 1/300th, I know with my camera I can get a shot at 1/60th but you may find your limits are less or greater than mine. There will be a mode on your camera for selecting the shutter speed manually via the mode dial or menu (normally called S or TV mode) this will enable you to select the shutter speed whilst the camera adjusts the aperture automatically to produce a photograph of the right exposure.
Alternatively you can select fully manual (normally M on the mode dial or menu and available on most prosumers and compacts) and then adjust shutter speed and aperture and use the light meter on the camera to balance the two.
Aperture – This setting will determine the size of the ring allowing light into the camera, in SLRs this is built into the lens itself. The easiest way to explain this is with a diagram.

You will note that the bigger the aperture the more light will enter the camera but the lower the F number (Focal Ratio) I mention this because it takes a while for people to get their heads round the higher number less light issue, this is a standard measurement across all cameras but the range will vary between cameras and lenses, and in photographing your tanks changing the aperture manually will be essential.
So find out how to select the aperture manually, in many cameras you will be able to switch modes on a mode dial or via the menu to select aperture priority (normally called mode A or Av). The camera will then automatically select the correct shutter speed to produce a photograph of the correct exposure or you as with shutter speed balance both elements yourself using the fully manual setting and the light meter.
Balancing the Elements
Once you have set the ISO setting it shouldn’t require much changing. The main balancing act is between Shutter Speed and Aperture to produce a sharp, correctly exposed image. It may seem that we can just select the lowest possible F number and thus allow the most amount of light into the camera and then let the camera select the highest possible shutter speed, reducing the chance of movement causing blur, but changing the aperture has a 2nd effect which is to change the amount of the picture which is in focus (depth of field).
Depth of Field
This is one of the most essential elements especially when it comes to Macro photography. If you select a very low F number to allow a lot of light into the camera this has the effect of reducing the amount of a photo that is in focus, this is referred to as depth of field. I have taken some shots to specifically illustrate this below


Both of the above photos help to give a sense of distance and is a useful technique when photographing landscapes and structures, it both gives a sense of distance and a reference point and to draws the eye into a picture.
The following ones show firstly how the attention of the eye changes as you suddenly notice the spiders web in the first one on the out of focus shot which demonstrates how you can draw the eye to one point of the photograph. In the other you will see the depth of field is so narrow even parts of the wall in the foreground are slightly out of focus. All of these were taken at the same ISO setting and with the camera taking care of the shutter speed, all I did was alter the Aperture (A or Av mode).


The effect of changing it in Macro is greatly increased and you will understand why some close up tank photos have only one tiny area of the photo that are in focus.
Focusing
We may also need to override the automatic focusing on an SLR focusing is controlled manually by adjusting a ring at the base of the lens. On a compact there is normally little or no manual focusing option and on Prosumer cameras it normally has to be selected via the menu. Not being able to focus manually means that you normally have to wait for the camera to double check the focusing and have a bit of thinking time between you pressing the button to take the photo and it actually taking it, we will come back to ways to overcome this next week.
This weeks task if you want to join in
1) Go and play with the aperture settings of the camera take two shots one at the lowest and one at the highest and focusing on the same thing in each one, either the furthest or the closest and see what the range of your camera is, it may not be as distinct as the photos I showed here but it will show you how a shot can be altered by changing the depth of field. Post results on this link.
2) Work out how low you can go with your cameras shutter speed and still get a photograph that is in focus.
3) Take a photo with your camera at the lowest ISO setting and then at the highest and post them here. Take the two shots of the same thing and do it outside in daylight on a bright day otherwise you won’t be able to get a shot at the highest setting and see the difference in image quality.
No editing and no need to be arty it’s just an exercise to get you understanding the effect changing these settings has on your pics.
Remember to post your pics and questions HERE, and if something wasn't clear then please ask me to explain again either by pm or on the responses topic.
Next week I will start with a fault finding guide to work out why your shots may not turn out as you would wish and we will cover Set up of Marine and surrounding area, focusing technique, Macro, White Balance and Flash use. Then shot composition and editing.
