Tank Renovation

The December FOTM Contest Poll is open!
FishForums.net Fish of the Month
🏆 Click to vote! 🏆

dgwebster

Fish Herder
Joined
Dec 1, 2005
Messages
1,386
Reaction score
1
Location
GB
so after a long tiring time of running, my main living room display tank is now going under a renovation whilst I currently have it all in pieces and out the living room whilst we redecorated. The glass, filter & fish are staying with everything else being replaced although the hood will be last.
 
A new stand to house the filter is being built and I have decided to break away from the 'frame then clad' approach and instead going for a furniture board structure. I have based this on calculations of the weight of the new sand, water, ornaments and so forth and for the 40 gallon tank size, decided that this is adequate. It will also be supported by 6 adjustable cabinet feet. I managed to locate heavy duty ones rated to over 100KG each, so the spread load will be fine at around 40KG-50KG per foot. I have had to adopt this approach as I need around 25mm-30mm adjustment between the feet for a level surface due to the fact my floor was clearly done by someone with a ruler & level they got at a carnival or circus.
 
This is all going in oak coloured furniture board, with a black sand substrate. I will be replacing the existing Beech hood, but that may happen a while after the current changes. The plan is to steal the 'front flap' design on the hood that Zikofski used in his stand build as i liked solution a lot.
 
So fingers crossed these parts will be appearing before the weekend when we begin building :D
 
Well I got home today to some good and bad news.
 
The good news, someone delivered my new substrate, the black sand which looks like this:
 
20130508_215502.jpg

 
The bad news was someone also posted 25KG of the stuff on my local gumtree adverts, washed but unused. Win some, loose some. Overall very happy with my purchase so far.
 
Who is the manufacturer of your substrate? Looks nice quality :D
 
I will be honest, have not heaved the bag onto its other side to find out :) it was a £35 for 25kg Ebay job of black silica aquatic sand and I have spotted the phrasing "aquatic sand" on the bag. Once I empty it, I will take a look and update you.
 
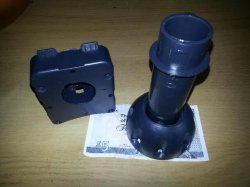
Good news today is the support feet arrived. Photo taken with a fiver for size perspective. As stated before, these are rated to 100KG each so between the 6 that  I will be using it will be more than enough to support the stand, tank and my two cats that are always atop the thing. rps20130510_182423_732.jpg
 
so leaps and bounds since my last post. On Saturday I paid a visit to my local B&Q Warehouse and purchase some contiboard and took it along to their cutting service. First time I have used this service and I LOVE it. Before I go into that, I ought to rewind a little bit and provide a back drop. The decision to go to B&Q was made very quickly. I had a rough idea of the design in my head and on a post-it note and with the dimensions of the panels available made some quick cut requirements. This was designed to work with the existing widths provided by B&Q:
 
  400 x 600  Qty 3  - Doors
  380 x 600  Qty 4  - Vertical Supports & Sides
1220 x 600  Qty 1  - Back
1220 x 380  Qty 2  - Top & Bottom
 
Nice and simple design for this one here, with off-cuts being used for some extra top bracing. Armed with my post-it and the kids dropped off at grandparents, we zoomed off to B&Q. There we had a slight shortage in the melamine colours I had initially hoped for but with some humming and ha-ing decided on a two tone to work with the new decor in the living room. Bing-bada-boom and 20 minutes later I'm carting the wood off home.
 
I was subsequently busy after this and started working on it again yesterday. This was when I noticed the schoolboy error. In designing the vertical supports, I had not taken into account the thickness of the doors or the back of the stand wood (both designed to sit within the top & bottom panels.) Each of them were 36mm too large. Armed with a parallel multi-cutter tool I set about trimming this off and.... snapped the cheapy cutting bit in two about 2" into the first panel.
 
Trying to figure out if my old man was able to dig out his table saw or his circular saw from the pit of doom known as the garage, my wife suggested asking B&Q. One phone call and 30 minutes later I was back in home with 4 panels now 36mm shorter. So correct that list above if you plan on copying this from:
 
  380 x 600  Qty 4  - Vertical Supports & Sides
 
to
 
  344 x 600  Qty 4  - Vertical Supports & Sides
 
Adjust this if your boards are NOT 18mm thick!
 
Step 1: drew lines all over the boards, 9mm in from the edges on the face for the top & bottom boards, on the edge for the back & side supports.
 
Step 2: Drew centre lines for the two internal supports 406mm in from either side.
 
Step 3: Marking 120mm from edges, drilled 6mm holes 10mm deep into the top & bottom and 20mm deep into the back, side & internal supports (the ones going edge on, otherwise 20mm would have made a hole!)
 
Step 3: inserted 6mm x 30mm dowels.
 
Step 4: push fitted the lot together. Measure once, cut twice. That is a motto you do not want here, make sure you account for your wood thickness when measuring from the edges and become "measure twice, cut once". I was really happy that the entire lot fitted together with a 1mm difference on one edge, but the holes still lined up (guessing that was me being slightly off with the ruler there!) and required some good thumping to fit it together, good enough to be able to lift the entire piece by any end as a result.
 
Step 5: Secure fitting. Drilling a pilot hole and counter sinks, I used 2" double thread wood screws to secure all the pieces together. All of these are done from the top & bottom so no screws will be visible in the finished piece which I like.
 
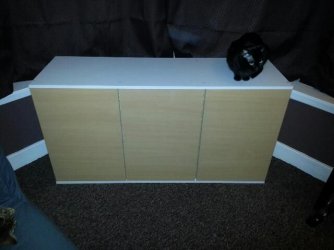
This is where I am at right now. End of the night last night, I moved the unit to sitting in the window bay for now (that's not where it will be finally sited.) and pushed the doors into place. As the gaps for the doors are 600mm and the doors are 600mm I do need to plane these down 2mm to allow clearance and the hinges fitted. Fingers crossed I will get this done, the feet fitted and the lot levelled out tonight. For now, here is a photo of the "Cat Stand" last night. 
 
rps20130514_080716.jpg
 
As you can see, its got a beech primary colour, with what will be a think framing of white once the tank is on top, matching the woodwork in our living room.


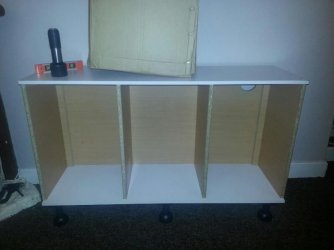
So I did not get anywhere near as far forward as I had hoped tonight. Feet on, additional screws between the back & the vertical perpendicular supports. I also got the feet attached and the unit place and levelled:

rps20130514_223901.jpg

The box contains the sand, dumped this on top to provide some weighting during the levelling. As it is on the carpet I will be checking this repeatedly as I add more.

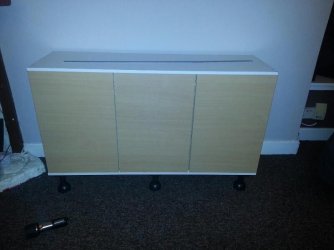
With the doors in place. I kind of like it without handles on the door, think I way opt for the Ikea-style push to open method.

rps20130514_223717.jpg
 
Whats the max weight on that cabinet rated for mate?
I've seen some metal dowels you can buy from Ikea to give the sides a better support. 
I find chip board stuff bows quite a bit you can see it on cheap wardrobes when they get too heavy or wet with moisture which is the killer.
Excellent progress so far though!
 
The feet can take 600KG as a spread load, the cabinet however is a different story. As it has been built from furniture boards myself, maximum load weights are not available. I therefore applied certain criteria on my decisions that I called the "kitchen cabinet theory". The boards themselves are 18mm, not the 15mm of my kitchen cabinets (or that you find in cheap wardrobes which may also drop to 12mm panels), with full 18mm back (not 2/3mm fibreboard) and the perpendicular supports are 407mm apart, rather than the 600 on my kitchen units. All parts are dowelled then screwed together and a central shelf in the middle cupboard is to be added as well.
 
From this, I then thought through the following: I have had 3 fully grown adults sit on a double kitchen unit without failure. This is not a properly spread load, with it being added at various points and come to about 260-300kg, plus whatever is in the cupboards loading the feet too. So far I have tested the new unit with the Wife and I sitting on it to no ill effect and its only a 40 gallon that is going up there: it used to be supported by an Ikea Lack coffee table. I would definitely NOT recommend this build type for tanks beyond this in size but instead recommend a clad 44mm x 64mm stud frame.
 
I am quite interested in learning more about the dowels you mention though: are these externally fitted or a drill through support (like iron reinforced concrete?)
 
Just google cam dowels and cam locks not sure if its suitable as some drilling will be needed, but as for the metal through rod I wouldn't do it, just because if the length of the hole is not right its a waste of a board.
A few inches is okay, but depends how thick the rods are and if you run the risk of weakening the board by going to close to the edge?
 
I think I know what you mean: I purchased 34mm cam dowels and 15mm cam locks from Screwfix but decided without a jig & router bit I was going to make a total mess of it and upset the wife when I go to buy more supplies. For that reason I dropped out using them and opted for the wooden dowels & the 2" double threaded wood screws instead, will supply all that is needed on that front, looking for it to stay in place under compression rather than tension.
 
Reinforced fibreboard... hmm...
 
Should have added for anyone wanting to know, I added an 89mm hole for all manner of cables, tubes and pipes to be delivered through using a... 89mm hole saw. Nothing really exciting there except for a LOT of noise cutting it, but they do make a lovely round job.
 
Overall I'm not concerned about moisture: Have been running a 15mm melamine fibreboard hood for about 6 years now with zero problems and that's above the evaporation source :D
 
Fingers crossed I get the tank clean out and the new sand cleaned and the lot loaded tonight. Will be taking it easy, will re-calibrate the bubble meter on my phone using a manual one to validate it, then monitor changes regularly as it can take readings and store them on the phone. This will expose movement and any bowing and prompt a stop & re-think. I am very confident in it, especially considering what it used to sit on but still, cannot ever be too careful when it comes to that much glass & water!
 
Well you can always rub some CT1 over any exposed board fibres so if you do spring a leak none of it goes into the board at all.
Nothing stopping you from buying a few cheap bolts dremel them to size and replace the wooden ones with the bolts.
 
People generally think dynamic force goes right down, but from a structural engineers perspective who looked at my house recently, said weight is allways at an angle roughly 45 degress out, hence if a wall is cracked is usually in a diagonal direction and cracks never go straight down. Thats massive weight though not sure if it applies to tanks and cabinets LOL!
Toolstation is usually cheaper than Screwfix as I recently ripped a new hole in my wallet for the bathroom and conservatory and it still goes on!
one thing Ikea use a simple reinforcement planks on every bottom structure just to stop movement at there bases, it might be worth cutting a couple of planks and sandwich the base legs for that reason or even across two main legs?
It makes sense as it does act as a barrier to warping/movement at the most stressfull weight bearing points.
 
:D the bottom & underside are to receive some lovely cross members, 36mm under the tank rest and 150mm around the feet (luckily doubling as a plinth).

Further update today, tested the tank on the structure, started washing the sand which is in a really dirty state. This is being continued tomorrow at the old folks to be able to bucket n hose the job easier.

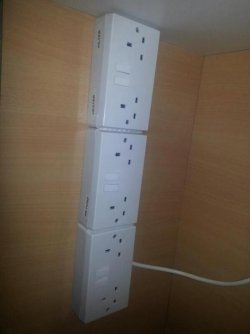
The electrics went in. Pulled from the old setup, its an easy system of 3 doible gang 13amp sockets supported by 1.5mm 3 core flex and a 13amp plug. The flex seen in this photo is routed in a drip loop.

rps20130515_232934.jpg
 
the tank was lifted into place yeaterday & the sand washed. The sand was marked "Premium Aquatic Sand" so it seems like a rather generic job - washing it was LOTS of fun, the kids kept thinking Pitch Black from Rise of the Guardians was attacking our home! This substrate is EXTREMELY fine, around 300-600 microns wide, finer than the good ole Argos play sand. As a result, it has this NASTY habit of collecting on air bubbles and floating to the top. My personal instinct is, 600-1000 micron would be better and I may end up replacing this in the future, depends on how badly it keeps reacting with my plec kicking it up all over the place.
 
Moving on, the tank was filled with water over a course of 2 hours at a trickle-ish feed. Every 5 minutes or so, level readings were taken across the tank and all members of the stand structure. With the exception of a 0.5-1mm movement to leaning frontwards about a third of the way through filling there was no other movement or bowing (a small quarter turn on the feet adjusted this back and was probably caused by movement on the carpet/underlay as the mass increased.)
 
The new heater plumbed in with the filter and the lot switched on. THIS was when I realised that although I emptied the filter of water 2 weeks ago (this has all been part of a greater re-decoration so the fish have been living in a temporary 20 gallon with a different filter), I didn't rinse the media so I pumped a crud load of dirt into my newly filled tank! A half change & running the tank overnight whilst it gets up to temp has since been running.
 
Pictures will follow later today :)
 

Most reactions

Back
Top