My Tank Stand Build

coldcazzie

Ice Queen
Joined
Aug 7, 2009
Messages
4,734
Reaction score
0
Location
W.Yorks, UK
Well I went and bought the wood yesterday for my tank stand - am building it smaller than I originally planned, partly to keep costs down and partly because I don't want to tick hubby off getting too many tanks LOL

So, here's the first lot of pictures, up to this morning:

Drilling wood
IMG_2555.jpg


Finishing frame for one shelf
IMG_2556.jpg


Starting second shelf
IMG_2557.jpg


IMG_2558.jpg


IMG_2559.jpg


First leg on
IMG_2560.jpg


With extra beam across top shelf to hold light fitting for tank underneath
IMG_2561.jpg


Anyone who has more3 experience than I do got any ideas on how to attach the legs etc and make the shelves level while also avoiding wobbly leg issues??
 
Hmm, looks fun! Currently in the process of designing a stand for my 200x75x75 which my husband managed to convince me that I really want..
 
And some more:

with second shelf added (with ply on it) and second and third legs
IMG_2563.jpg

IMG_2564.jpg

IMG_2565.jpg


attaching 4th leg (this was the most fun as the wood for the shelf was warped so this corner was an inch higher than the other corners!
IMG_2566.jpg


upright in it's final position, believe it or not the family are sat on it to see if it wobbled once there was weight on it! :)
IMG_2567.jpg

IMG_2568.jpg
 
wow pretty impressive!!! i like the custom tanks with stands, looking forward to an update
 
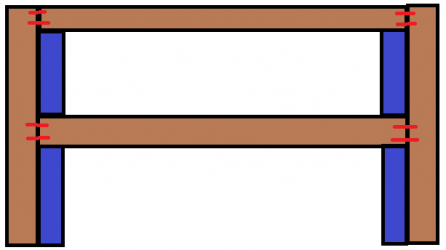
the construction looks pretty solid however the weight is being put on the screws which you rish shearing them off! to sort this I would cut legs to fit on the inside of the current legs, this transers the wieght straight down through the legs, does that make sense?

edit: heres a quick paint pic to explain a bit better, in red are the screws which once tanks are on and full will be under a lot of shear stress, add the bits in blue and it will be a lot lot stronger :)
 
If you are worried about wobbly legs, run a piece of plywood across between the legs and screw it onto the legs. They will not be able to move at all if you do that. As Mini_Matt suggested, it is better to rely on the strength of the wood than on the screws for support. I have a few pictures that show how I went about it in a thread you can reach from a link in my signature. I did not use heavy wood like you have and I do have a fair assortment of toys, er tools, to draw on for mine.
 
I do indeed understand mini matt - it's a good point.
I do have another 2.5m piece of 2x4 which I haven't used yet (and if I don't use will return to shop), which I could break into. However, as the bottom shelf needs to house a 3 foot tank and the stand is made to measure I can't put extra legs at the front to support the top shelf.

We are cutting a piece of ply for the top shelf which will rest on the tops of the legs as well as the shelf that's been built, so the top shelf will spread the weight across the legs. The bottom shelf can be supported with extra legs as you suggested.

If we feel we need it we are going to add extra legs at the back of the top shelf, but at right angles, so that a brace can be added parallel to the shelf, underneath it, going from front to back.

Not sure I've explained that very well lol.
 
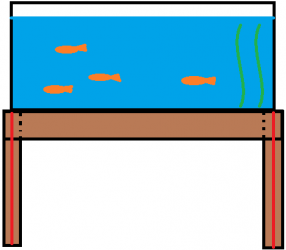
not sure I understood the last bit, how it was always explained to me basically a tank is classed as dead weight and one it is there it will be there 24 7 for a number of years in most cases (my gf likes moving the front room around so setting up my new tank is my plan to stop her doing this!) therefore while it can take the weight of the family there is no way to test for continual weight really.

basically ideally you want the weight of the tank to be transfered the the frame to the legs pic:tank stand.png can you tell I like using pictures to explain? lol :good:
 
hehe I see that! :)

I used Tolak's homemade stands as inspiration.

The family sitting on it was to test to see if it wobbled with weight on, as while it was on the concrete kitchen floor it wobbled, but once we put it on the carpet with weight on it didn't - that was what it was for, not to see if it would take the weight.

What I meant was: View attachment 58625 extra legs underneath the bottom like so, and then View attachment 58626 this is a birds eye view - so the blue bits are the legs currently, and then the green is extra legs but sideways, and then the pink is horrizontal underneath the shelf.

Still not sure I've explained it very well! lol.
 
Well we've been debating all week whether or not the stand is strong enough, eventually decided we would ask a friend who is a joiner - he says it is but woul be better attached to the wall and also with a sheet of ply underneath it to spread the weight more evenly.

So today we are buying a sheet of ply to finish it, a couple of bits of hardboard to make the back, and some varnish. Will post more pics later :)
 
Nice move there Cazzie. It is always better to ask someone who can actually examine the build and give advice on the strength. We can only do so much to help from a remote location like this.
 
Indeed. Although help from afar is always appreciated! :)

WE are going to add some blocks under the joins just to be on the safe side (better safe than sorry), but other than that leave it as is. Ply has been ordered and should arrive tomorrow - place we went yesterday didn't have any.
 

Most reactions

Back
Top