🌟 Exclusive Amazon Black Friday Deals 2024 🌟

Don’t miss out on the best deals of the season! Shop now 🎁

What's the deal with lighting?

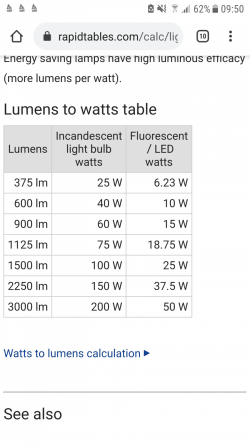
Found a watt to lumen led table. According to the table I have about 20 lumens per liter. That's not great, then I need at least 3 triple the current lighting to make sure my plants stay red. While I'm sure my java ferns will definitely not survive that much light without giving them a decent amount of shade.

Might need to rethink on how to design my tank to meet the needs of all the plants. Your insight really helps btw @utahfish!
 

Attachments

  • Screenshot_20200819-095034.png
    Screenshot_20200819-095034.png
    131.3 KB · Views: 112
Wow yeah that actually looks great... Unfortunately that wouldn't work for me, I have an overhead filter box that spans the entire length of the tank.

Could always look into diy lamps that span the length as well. Never thought of doing anything with my hands, much less diy before having a tank. Now all I do is look for ways to make whatever it is I need by myself.

On that topic, any experience with diy CO2 made with baking soda ans citric acid?
 
What do you mean by angle of light and color spectrum?
Sorry with 'angle', I meant that the LEDs sometimes don't give a wide angle of light. So when the fitting is above the tank, the edges/corners become poorly lit and you may need to lift the fitting higher somehow.
You don't tend to get this issue with florescent for example as obviously these lamps give off light in nearly every direction.
 
On that topic, any experience with diy CO2 made with baking soda ans citric acid?
I've had some success with that diy co2 method.
Quite impressed by the concept of it actually. I used to use the sugar yeast setup but the problem is that it is a constant and uncontrollable reaction, whereas the citric acid baking soda method can be 'switched off'.

Bottle A contains citric acid and bottle B contains baking soda.
The reaction takes place in bottle B and bottle B feeds the tank with co2.
When the pressure in bottle B drops, it forces mixture from bottle A to be fed in, thus starting another reaction, creating more co2 and increased pressure.

This is the kit I got, there's lots of similar designs probably just as good. You'll also need a bubble counter, a diffuser and ideally a co2 indicator (blue-green) and a solenoid is a good idea to save you from having to manually stop the co2 reaction continuing over night. This is the solenoid valve I got.

I found was that the 'tap' that came provided, used to adjust the amount of co2 pressure going into the tank, was poor quality and leaked. So I also picked up a better quality needle valve.

The key is to ensure you have no leakages, make sure everything is screwed together super tight.
The mixture tends to last me 2-3 weeks at a time because I inject at a lower rate (around 1 bubble per second).

Another important factor is to ensure you have good circulation in the tank so that the co2 and any ferts are reaching all of the plants.
 
Wow yeah that actually looks great... Unfortunately that wouldn't work for me, I have an overhead filter box that spans the entire length of the tank.

Could always look into diy lamps that span the length as well. Never thought of doing anything with my hands, much less diy before having a tank. Now all I do is look for ways to make whatever it is I need by myself.

On that topic, any experience with diy CO2 made with baking soda ans citric acid?
Yup ive done DIY CO2 its messy and more trouble than its worth.
Tomm barr who came up with the EI method for fert dosing said that the two nutrients that lead to the most problems with algae are ammonia and CO2. CO2 inconsistency he said was the main contributor to algae. DIY CO2 out put can be very inconsistent as out put can be dependent on temperature of room and just the nature of the interaction of the sugar and yeast. They need to be refilled are charged regularly as well which is just one more mess. Thats my take on them at least.
 
I've had some success with that diy co2 method.
Quite impressed by the concept of it actually. I used to use the sugar yeast setup but the problem is that it is a constant and uncontrollable reaction, whereas the citric acid baking soda method can be 'switched off'.

Bottle A contains citric acid and bottle B contains baking soda.
The reaction takes place in bottle B and bottle B feeds the tank with co2.
When the pressure in bottle B drops, it forces mixture from bottle A to be fed in, thus starting another reaction, creating more co2 and increased pressure.

This is the kit I got, there's lots of similar designs probably just as good. You'll also need a bubble counter, a diffuser and ideally a co2 indicator (blue-green) and a solenoid is a good idea to save you from having to manually stop the co2 reaction continuing over night. This is the solenoid valve I got.

I found was that the 'tap' that came provided, used to adjust the amount of co2 pressure going into the tank, was poor quality and leaked. So I also picked up a better quality needle valve.

The key is to ensure you have no leakages, make sure everything is screwed together super tight.
The mixture tends to last me 2-3 weeks at a time because I inject at a lower rate (around 1 bubble per second).

Another important factor is to ensure you have good circulation in the tank so that the co2 and any ferts are reaching all of the plants.
Wow if one has to buy all that might as well just get a pressurized tank ;)
 
Wow if one has to buy all that might as well just get a pressurized tank ;)
Haha... well..... yes and no :p
You'd still need the majority of all that even for a pressurized tank setup: the bubble counter, needle valve, solenoid valve, co2 indicator and diffuser..
Only difference is using coke bottles and £20 bit of kit off ebay/amazon

The citric acid and bicarb is a vast improvement on the sugar and yeast method in terms of consistency.
Yup i have a pressurized system, its currently empty so not in use but i figure if one is going to spend on all the stuff one would need for a pressurized might as well just spend the few extra bucks on a pressurized tank.
To each their own. I dont have any red plants so have zero use for CO2 but to each their own!
 
Sorry with 'angle', I meant that the LEDs sometimes don't give a wide angle of light. So when the fitting is above the tank, the edges/corners become poorly lit and you may need to lift the fitting higher somehow.
You don't tend to get this issue with florescent for example as obviously these lamps give off light in nearly every direction.
Ooh that's actually quite alright, I places my light so the majority of ths light falls the red background plants. My middle and foreground plants are low light plants and the javaferns in the back are covered by the shade of the frogbit.
 
I've had some success with that diy co2 method.
Quite impressed by the concept of it actually. I used to use the sugar yeast setup but the problem is that it is a constant and uncontrollable reaction, whereas the citric acid baking soda method can be 'switched off'.

Bottle A contains citric acid and bottle B contains baking soda.
The reaction takes place in bottle B and bottle B feeds the tank with co2.
When the pressure in bottle B drops, it forces mixture from bottle A to be fed in, thus starting another reaction, creating more co2 and increased pressure.

This is the kit I got, there's lots of similar designs probably just as good. You'll also need a bubble counter, a diffuser and ideally a co2 indicator (blue-green) and a solenoid is a good idea to save you from having to manually stop the co2 reaction continuing over night. This is the solenoid valve I got.

I found was that the 'tap' that came provided, used to adjust the amount of co2 pressure going into the tank, was poor quality and leaked. So I also picked up a better quality needle valve.

The key is to ensure you have no leakages, make sure everything is screwed together super tight.
The mixture tends to last me 2-3 weeks at a time because I inject at a lower rate (around 1 bubble per second).

Another important factor is to ensure you have good circulation in the tank so that the co2 and any ferts are reaching all of the plants.
That's good to hear, I am honestly more interested in the fact that you can be done with barely 25 usd. I have been shopping around and co2 canisters are currently well out of my price range. At the moment I only have 2 tanks but I am getting another one next month. I would need at least 2 cannister to feed all 3 tanks which definitely be out my price range.

I don't have many red plants and the rest of my plants are low on co2 needs. It would be great though if I could use a diy setup to give my plants that thick and luscious look. Besides that some of my plants are having trouble taking off and some are downright shedding half their leafs so co2 could help adjust to their new tank too.

I will be aiming for 1 bps too, you said that lasts you about 2 to 3 weeks? How many gallons is your tank and what size bottles are you using? Reading online and on reviews most commercial diy sets come with crappy "taps" but I already am prepared to change out some of the parts that come along.

Ferts are no problem for me, I have a fertilized substrate bottom and soil on top. I think my circulation is pretty decent, I used to have diy spray bars running along the back and the left side of the tank. Didn't really seem to do anything so I just lowered them into the water. Provides ample circulation and a slight current at the top for the fish to swim against. Where do you hang your diffuser? I was thinking close to my filter output, or it better to have it close to the input?
 
Yup ive done DIY CO2 its messy and more trouble than its worth.
Tomm barr who came up with the EI method for fert dosing said that the two nutrients that lead to the most problems with algae are ammonia and CO2. CO2 inconsistency he said was the main contributor to algae. DIY CO2 out put can be very inconsistent as out put can be dependent on temperature of room and just the nature of the interaction of the sugar and yeast. They need to be refilled are charged regularly as well which is just one more mess. Thats my take on them at least.
Yeah it definitely more work than a reasy to go canister. But then again it is also a fraction of the cost and I don't have to fill them every few weeks.

I never looked at the sugar and yeast reaction maybe those are also a lot more inconsistent than the citric acid and baking soda solution?

A bit of algae would honestly be alright, my little oto army is always on the lookout for a tasty algae meal. I know, I'm asking for opinions with a specific answer in mind but for now canisters just aren't in the cards yet.
 
Yeah it definitely more work than a reasy to go canister. But then again it is also a fraction of the cost and I don't have to fill them every few weeks.
A few weeks! I used to use a sodastream canister when I had CO2 in a 450 litre tank. But one canister used to last over a year.
 
What is a pressurized tank?
Many people use fire extinguishers or as seangee mentioned, sodastream bottles to hold pressurised co2. Once you've picked up most of the pieces, they can be adapted for use on a pressurized tank once you get the funds, if the diy coke bottle method has served its purpose. Ive got 1.5 litre coke bottles. My tank is 52 gallon
 

Most reactions

Back
Top