Roma renovation project!

Hairy_Trev

Mostly New Member
Joined
May 16, 2015
Messages
75
Reaction score
21
Location
GB
Hi People!
Been a long time since I visited TFF so I'm making a return with details of a new (?) project...

At the start of this year, I was driving home and by the turning into my road, I looked across and saw that someone had dumped/fly-tipped a large aquarium! I went out that night with a friend and did my bit of wombling (for the british readers) to tidy this piece of litter.

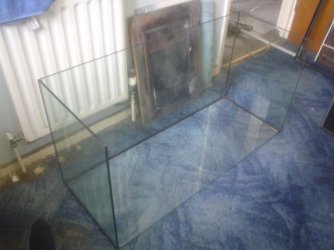
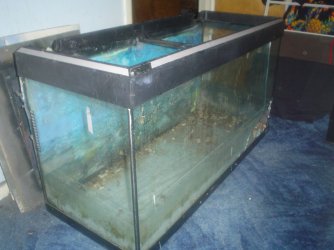
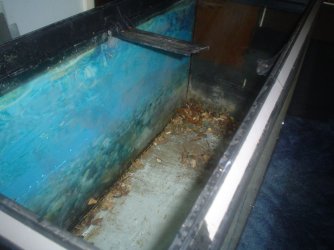
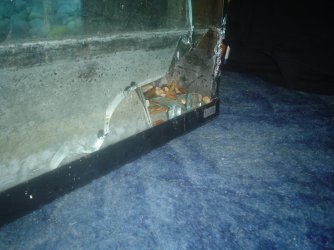
Inspection revealed it to be Fluval Roma 200, dirty, lime scaled, full on stones, dead leaves, insects and general muck... and with the added features of a snapped brace bar crossmember on the plastic trim and a generous ventilation hole smashed in the front glass.

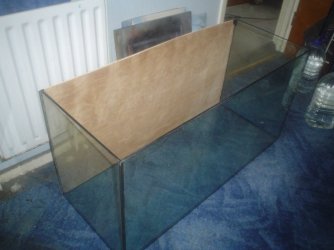
I cleaned it up, removed the trim and replaced the broken glass with a piece of plywood, ready to sell on for people who keep reptiles. No takers left me with a sad keepsake of my neighbourly clean up.

NEW PROJECT NOW:
A piece of glass was purchased to replace the front, (turned around now to become the back) along with narrow strips of glass across the top edges front and back to brace the tank. The broken plastic brace bar has been cut away and the top trim has been re-glued to make it stronger.

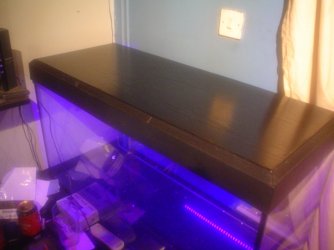
The missing lid panels have been replaced with a single sheet of lightweight plastic kinda stuff (dunno what it's called), and covered in black ash style fablon/sticky backed plastic. A search on ebay located a 720mm LED multicolour light in a T5 tube with remote control. (Not dazzlingly bright but enough to illuminate the tank). An old filter donated by a neighbour has provided me with a pump and this will be fitted to my own DIY filter housing.

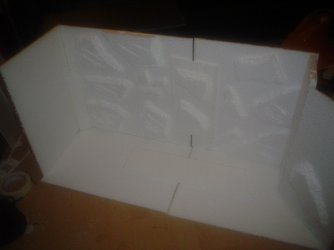
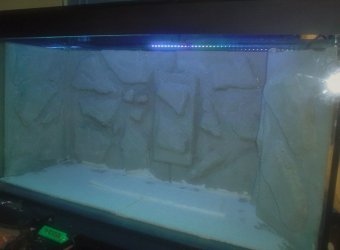
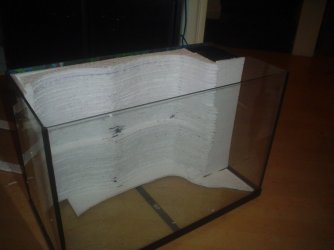
Current activity is the making of a custom 3D rock wall for the tank. A polystyrene frame surround has been stuck together, with irregular shaped pieces of polystrene stuck randomly over it and then hacked to take off the angles. This will be covered with several coats of ready-mix cement before gluing inside the tank.

Further photos will be added as the task progresses... for now, enjoy looking at the restoration of this piece of old junk!!!
DSC00038.JPG DSC00039.JPG DSC00043.JPG DSC00050.JPG DSC00053.JPG DSC00009.JPG DSC00013.JPG
 
Hi People!
Been a long time since I visited TFF so I'm making a return with details of a new (?) project...

At the start of this year, I was driving home and by the turning into my road, I looked across and saw that someone had dumped/fly-tipped a large aquarium! I went out that night with a friend and did my bit of wombling (for the british readers) to tidy this piece of litter.

Inspection revealed it to be Fluval Roma 200, dirty, lime scaled, full on stones, dead leaves, insects and general muck... and with the added features of a snapped brace bar crossmember on the plastic trim and a generous ventilation hole smashed in the front glass.

I cleaned it up, removed the trim and replaced the broken glass with a piece of plywood, ready to sell on for people who keep reptiles. No takers left me with a sad keepsake of my neighbourly clean up.

NEW PROJECT NOW:
A piece of glass was purchased to replace the front, (turned around now to become the back) along with narrow strips of glass across the top edges front and back to brace the tank. The broken plastic brace bar has been cut away and the top trim has been re-glued to make it stronger.

The missing lid panels have been replaced with a single sheet of lightweight plastic kinda stuff (dunno what it's called), and covered in black ash style fablon/sticky backed plastic. A search on ebay located a 720mm LED multicolour light in a T5 tube with remote control. (Not dazzlingly bright but enough to illuminate the tank). An old filter donated by a neighbour has provided me with a pump and this will be fitted to my own DIY filter housing.

Current activity is the making of a custom 3D rock wall for the tank. A polystyrene frame surround has been stuck together, with irregular shaped pieces of polystrene stuck randomly over it and then hacked to take off the angles. This will be covered with several coats of ready-mix cement before gluing inside the tank.

Further photos will be added as the task progresses... for now, enjoy looking at the restoration of this piece of old junk!!!
View attachment 85655 View attachment 85656 View attachment 85657 View attachment 85658 View attachment 85659 View attachment 85660 View attachment 85661


Further progress...

Although I'll admit that I wasn't being particularly precise in my work (in other words "it was cobbled together with availible scraps"), I've got through further work on the rock wall...

I'm generally pleased with the overall look, but need to make a couple of tweaks. With only 1 coat of cement on the faces, there are areas which need touching up and unfortunately, the area on the right hand side doesn't quite go high enough. I'll remove this panel and raise it a little.

DSC00015.JPG

If that doesn't work, then I'll resort to starting again, in the manner which I'm more familiar with, done on my first tank (see extra image)

further construction.JPG completed construction.JPG 10th April 2015.JPG
 
Second attempt... left side and back finished but not fitted... right hand side half finished, and test-fitted...

Looking good!
DSC00029.JPG
 
Looks great. Pardon my total ignorance, but when you say "cement" are you talking brick layers cement, or something totally different ?
 
Looks great. Pardon my total ignorance, but when you say "cement" are you talking brick layers cement, or something totally different ?

Thanks for the comment Tony... and no, you're not being ignorant and are quite right... it is Readymix mortar which you can buy from Wicks builders merchants in a 2kg bag for about £2.50ish.

A first coat of a fairly runny mix is painted onto the polystyrene and left to dry. A second coat mixed to a creamy paste is added and left to dry before a third coat of runny. When finished it leaves a quite hard but rock-like surface.

The finished rock wall will make the water very cloudy at first, due to lime in the mortar disolving into the water and sending Ph levels haywire so the structure needs to be thoroughly rinsed/soaked several times first until water remains clear to ensure water quality.

A search on youtube for "DIY aquarium 3d background" brings up numerous options for design... hope it inspirs you!
Thanks for the reply Trev. I did wonder about the effects it would have on Ph, but this can obviously be overcome by rinsing. I feel a project coming on !
 
Thanks for the reply Trev. I did wonder about the effects it would have on Ph, but this can obviously be overcome by rinsing. I feel a project coming on !

If you choose to take on such a project (and I don't see any reason why you shouldn't if you're setting up a new tank) then a couple of quick extra comments for you, in addition to the need to THOROUGHLY rinse the unit after making...

First of all, polystyrene is an excellent material to work with as it's light weight and easy to cut. However, it is of course extremely bouyant so you will need to weight it down will you rinse it in your bathtub. Use lots of silicon to fix it to the back and base of you tank when fitting.

Also bear in mind that the cement surface is very abrasive so take care to avoid rubbing it against the front glass as it will leave scratches.

When you buy your cement from your local DIY store, DO NOT be tempted to take the opportunity to buy bathroom silicon sealant. Domestic silicon has an added anti-bacterial component to prevent moss/algae and other nasties from ruining your lavish bathroom suite... these additives will also kill the vital bacteria required for your filter to work so only buy silicon which is designed for aquarium use.

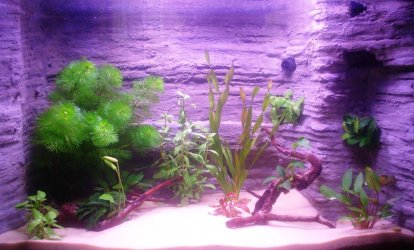
One of the wonderful aspects of making such a rockwall is that you can use your imagination to find ways of hiding items such as heaters and filter pipes behind the rock and leave a more natural look. A peek at the photos on this post of my first tank show a cave on the right hand side... this is actually the inlet to the filter housing and the filtered water is expelled through a fissure on the rear wall!

Use your imagination to cut channels behind the rock work for the water to flow!

GOOD LUCK!!!
 
After a little delay, finally major inroads have been made and a step forward!!!

Nervousness about how well I was doing led me to being less enthusiastic, but my encouraging followers wil be glad to know that the final rock wall was completed and fitted. A couple of areas were found to need a touch up with concrete and this was finally achieved.

It is unfortunate that such a project to completely repair, renovate and recommision such a tank, although done with the intention of finding a bargain, still requires financial outlay and as I have a limited income, this does slow me down.

However, it is my beleif that taking a major step forward will renew the earlier enthusiasm..... therefore...

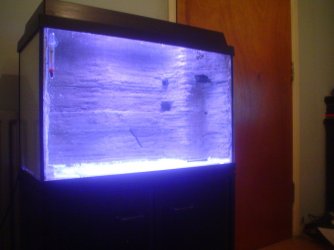
Tonight, finally satisfied that there was no more work to be done on the rock wall and filter enclosures, I spent an exercising 45 minutes trotting back and forth from my kitchen, armed with 5 litre water bottles. 20 trips later and the tank is now filled. This has been a much welcomed milestone as it allowed me to satisfy 2 objectives.

Firstly, the noise level of the filter pump under normal operating conditions in my small living room which has thankfully been found to consist of a noticeable, but not disturbing low hum.

The second investigation concerned the lighting. I have always enjoyed the way light 'ripples' against solid surfaces in pools and ponds as it creates a feeling of constant movement and life in such watery enclosures. Of course, water is flowing around all areas but it is not visibly doing so with the light interference. I am happy to see that my light unit fitted to the front of the lid, and the direction of the filter outlet has provided sufficient surface agitation to constantly change the way the light refracts, and has acheived the desired effect on my new rock wall.

A light covering of silver sand in the bottom of the tank, to cover the black worktop (and drips of cement) has finally given me the indication that I am going to acheive the intended style of tank.

I hope a glimpse of the video (if I can attach it) will give you an idea of the sense of fulfillment I feel... all I need now is another 20kg of sand, a heater and filter media... it'll be a shame to put fish in there to poo on my creation!!!!!

Next posts on this thread are likely to be the planting!!! Keep looking!!

Trev

PS: Couldn't upload the video clip directly, but hopefully, this link will show you the youtube posting
 
Last edited:
a generous ventilation hole smashed in the front glass.
that made me laugh really hard :)

This is an extraordinary effort and such a beautiful job!!!
Going to be the best before and after EVER!
Please keep posting! I can't wait to see it full of life!
 
that made me laugh really hard :)

This is an extraordinary effort and such a beautiful job!!!
Going to be the best before and after EVER!
Please keep posting! I can't wait to see it full of life!


Thanks for the comment and compliments... have you taken a look at my first aquarium project? Similarmethods used to create the rock work on a Jewl Rekord 70 litre... check out my profile pic
 
Thanks for the comment and compliments... have you taken a look at my first aquarium project? Similarmethods used to create the rock work on a Jewl Rekord 70 litre... check out my profile pic
Oh man that's really amazing....can you post a picture of it so I can see it bigger?!?
 
Oh man that's really amazing....can you post a picture of it so I can see it bigger?!?

As requested, a couple of pics of the initial construction of the rocks, the final set up with some planting and a short video taken 2 years later...

construction begins.JPG
further construction.JPG
completed construction.JPG
10th April 2015.JPG


Most reactions

Back
Top