Making A Sealed Lighting Box

StatMan

Fish Crazy
Joined
Dec 16, 2008
Messages
222
Reaction score
0
Location
Chelmsford, Essex
I have a tank that I got for free 30"L x 12"D x 15"H. The lights that came with it had seen beter days so I have bought a new set from eBay.

The New ones have a dual T8 setup, now I was planning on just using one tube to replace the existing one.

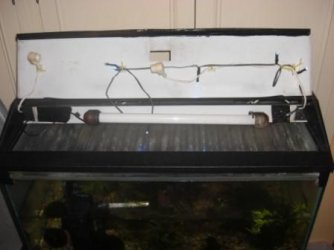
The lid for the tank is very low profile, Aquaseal, and there is room at the front to attach a light, the back has an area for the tube Starter and Powerpack.

The tank has a rim with a condensation tray sitting on top, which was left of hence the state of the old lights.

So I was thinking do I make a plastic surround for the tank that would raise the lid and also could I enclose the lights behind perspex and "seal them" and remove the clear plastic condensation tray?

Was thinking of getting some sort of black Plastic to make the sides then use the rubber you get for Greenhouse glass to make the seal.

Not brilliant at DIY but willing to give it a go.

Thought I would ask on here for ideas because there seem to be some very inventive people!

What would you do?

StatMan

Now with added Pictures, saves a thousand words!
 

Attachments

  • Platy_Tank_Front.jpg
    Platy_Tank_Front.jpg
    50.9 KB · Views: 54
get some pieces of mdf and set about making a hood that will fit over your tank but make sure there are some form of legs on the inside so it is raised, i presume its just a community freshwater setup? so one of these would do nicely:

[URL="http://www.charterhouse-aquatics.co.uk/cat...ller-p-731.html"]http
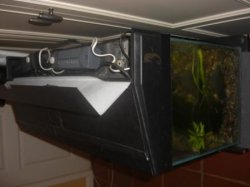
://www.charterhouse-aquatics.co.uk/cat...ller-p-731.html[/URL]

and then buy a 25 watt tube (make sure its 25 or it wont fit in the hood!) then you mount the tube and end caps in the hood and the starter outside, i did this with my 60 litre tank but used compact T5's instead and im 14 and i have the DIY skills of nooby carpenter (and thats bad)

oh by the way, if you go ahead with MDF give it a good 10-15 coatings of yacht varnish inside and out and paint it a colour you like
 
get some pieces of mdf and set about making a hood that will fit over your tank but make sure there are some form of legs on the inside so it is raised, i presume its just a community freshwater setup? so one of these would do nicely:

<a href="http://www.charterhouse-aquatics.co.uk/cat...ller-p-731.html" target="_blank">http://www.charterhouse-aquatics.co.uk/cat...ller-p-731.html</a>

and then buy a 25 watt tube (make sure its 25 or it wont fit in the hood!) then you mount the tube and end caps in the hood and the starter outside, i did this with my 60 litre tank but used compact T5's instead and im 14 and i have the DIY skills of nooby carpenter (and thats bad)

oh by the way, if you go ahead with MDF give it a good 10-15 coatings of yacht varnish inside and out and paint it a colour you like

Truck, thanks for the reply.

Your right community, It has about 40 Platies + fry, its in a temp location as it took longer to clear the space last weekend, will finish this.

I already have the lights:

http://cgi.ebay.co.uk/ws/eBayISAPI.dll?Vie...em=260350466861

So as you see a pair of tubes and starter for a reasonable price.

Was thinking of finding some black plastic as I am worried about using any wood, and also having to paint and varnish it. If your 14 then maybe I'll get my lad 13 to help with the construction, he is good at making Warhammer models and painting them, LOL!

So thought I could add a box section to go between the hood and the tank, but maybe I just make a new whole unit. Was thinking of encasing the lights so that the condensation tray is no longer needed


StatMan

Added a Picture of the front and here is one of the side:
 

Attachments

  • Platy_Tank_Side.jpg
    Platy_Tank_Side.jpg
    49.4 KB · Views: 54
As an eBay Associate we earn from qualifying purchases.
warhammer is awesome! you could use some perspex nd spray i from the inside with some 'chaos black' games workshop paint ;)

Truck

You should contact locker on the site, search for barbs thread, you two would get on!!

Chaos Black! Yes that rings a bell! The Platties are predominately blue, and my son is into Space Marines!! He got me to play him the other day I had a set of Orks! I think he stitched me up, I did not seem to stand a chance!

Not sure about the chemicals in the paint though that stuff stinks!

I guess I can put it in this weekend with the 1 light and then work on the "upgrade"

StatMan
 
So have now moved and setup the tank and its looking a lot better, have been able to rig up the new lights, only problem is that they come as a pair and they both need ot be connected for them to work. I guess I could find a dead buld as that might provide the circuit completion.

Anyway, back on topic I am now thinking more seriously about what to do for a hood, thinking that plastic might be too difficult to work with. Wood worries me but I guess enough of the top range tanks have wooden hoods so maybe I am being too cautious.

Would like to design something that is really flexible, i.e. can have flap at front, or even front and back for quick food access, but also maybe hinge the whole top up as well so maybe a split side effect with some sort of piano hinge on the back?

I still think the lights should be enclosed, thoughts?

Went round a few LFS over the weekend but noone seem to do hoods on their own.

Anyway I am of skiing next weekend so you have a couple of weeks to add some input.

Really would like to learn from some others that have tried this.

StatMan
 
I have the same hood on my 4ft tank - they're really crap but I've made do with what I have.

The lid section has reflectors mounted on the cross-beam section above where the light sits. The foil lip at the bottom of this was cut off to provide maximum light.
I've also mounted the second tube to the rear (cable access) section where you have the starter. This is then 'sealed' off with the same lid - it's made of 1 piece folded to strengthen it. If you peel this back, you get the perfect cover.

Doesn't make sense reading this.. but I'll try get pics later and show you. It works very well! :)

Martin would really appreciate if you could upload pictures, as if I can get away without the DIY it would be great, not my speiciality and I always want to do it right which means it takes up a large amount of time.

Ideally I would be able to lose the condensation tray and the lip, though that would need to be cut away but would give back another 1-2 inches in height.

StatMan
 

Most reactions

Back
Top