Diy Water Changer

BIGbadJOHN

Fish Fanatic
Joined
Apr 11, 2011
Messages
113
Reaction score
0
Location
Orange, Texas USA
I posted a question on what type of water hose to use when putting together your own Python type water changer and got some requests to show everyone how to do it, so here it is.....

This is my version, closest I believe to what you can make to the actual Python type water changer. In my experience I actually didn't save any money as compared to if I were to have bought the WalMart brand "python" which costs about $33 here. You'll definitely come out way ahead if you compare it to an actual Python. My increase in cost was mainly due to having to buy a gravel vacuum since I didn't have the size needed and also having to buy a couple extra adapters for my faucet since it's a smaller fitting than normal faucets. I bought everything at WalMart except for the gravel vacuum.

My costs included:

1-Waterbed drain & fill kit (found online) $7 x 1
1-Water supply hose (Apex RV/Camper 5/8" Hose) $10 x 1
1-Garden hose inline shutoff valve $1.50 x 1
2-Female garden hose splice ends $2.00 x 2
1-Male garden hose splice end $2.00 x 1
1-Gravel vacuum (Large Aqueon) $13.00 x 1
2-Faucet adapters $5.00 x 2

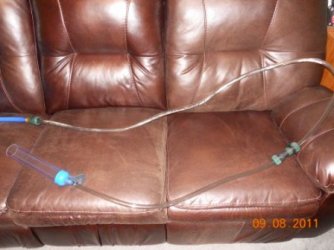
So as you can see, in all I spent $42.50. However, I don't think the gravel vacuum or at least one of my faucet adapters count since I needed to buy a larger gravel vacuum anyways and a lot of people won't have an oddball faucet like I do and will only need to buy 1 adapter or maybe none since the waterbed fill kit comes with one to fit most standard faucets. That would bring the total down to around $24.50. So you are saving around $10 if compared to a Lee's brand faucet gravel vacuum or an AquaCulture brand. The savings aren't HUGE unless compared to the actual Python. I would also like to add that the gravel vac I bought had 2 sections of clear tube and I chose to use both, thus making it look more like an actual Python with the shut off a little ways back off the gravel vac. By all means, don't cut your clear tube on your gravel vac just to make it look like mine. It's unnecessary and you'll actually save the cost of one splice end.

Also I've seen several sites on the internet stating not to use a regular garden hose with this set up because of the chemicals used on the insides of the hoses. I don't think a normal garden hose would be a problem though because, if you think about it, the first thing you'll be doing is sucking water out of your tank. So the water running through the hose from the tank will flush all the residual chemicals down the drain before you add water back in. Plus, I don't think hoses leach too much of that stuff unless they've been sitting out in the sun like they do in the yard. If you want to play it safe, get a drinking water or RV hose like I did. You could even get the all clear hose, but you may as well just buy a python if your going to do that.

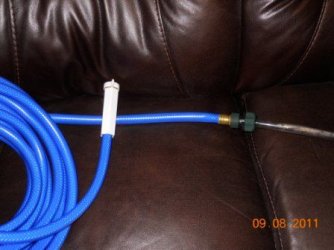
So here are the pictures of the finished product:

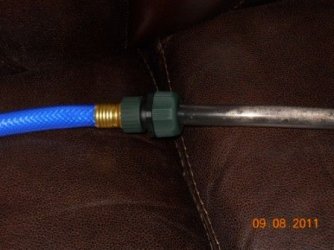
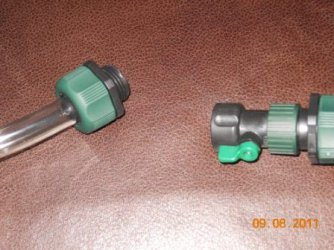
This is the first hookup you must make coming from the garden hose end. It's one of the female garden hose splice ends. It links the garden hose to the clear tube of the gravel vac.
 

Attachments

  • DIY Python 001.JPG
    DIY Python 001.JPG
    66.5 KB · Views: 115
  • DIY Python 002.JPG
    DIY Python 002.JPG
    66.6 KB · Views: 112
The pic on the top left is the section of the two clear hoses that came with the gravel vacuum. There was a siphoning bulb that spliced the two together, but of course I won't be needing that.

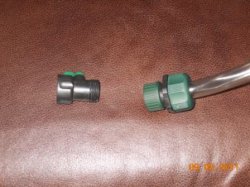
On the top right pic you put one of the garden hose splice ends on the gravel vac hose coming from the garden hose, then screw on the shutoff valve.

In the bottom pic all that's left is to put the last splice end onto the gravel vac end and screw it onto the shutoff! You're done! :good:
 

Attachments

  • DIY Python 003.JPG
    DIY Python 003.JPG
    66.5 KB · Views: 89
  • DIY Python 004.JPG
    DIY Python 004.JPG
    70.7 KB · Views: 76
  • DIY Python 005.JPG
    DIY Python 005.JPG
    77.2 KB · Views: 83
Looks good, what is exactly in involved in the crafting process ?, I really want too put one of these together, but my DIY skills are lacking :blush:

forgot to ask also, whats the pressure like on the gravel suction ?
 
Looks good, what is exactly in involved in the crafting process ?, I really want too put one of these together, but my DIY skills are lacking :blush:

forgot to ask also, whats the pressure like on the gravel suction ?

There's really nothing involved besides hooking it all up. Everything is made for you. You just have to put it together. Update though....I tried it tonight for the first time and it SUCKED. Not like it was supposed to either. I mean it didn't work worth a flip! Some people say the waterbed fill kits you get don't have enough suction on them. I really don't know why it doesn't work well. I don't think it's a problem with the hose or gravel vac because there isn't much to go wrong with those parts. The only thing I can think of is I don't have enough water pressure(which I highly doubt because we have pretty exceptional pressure), or the waterbed fill kit isn't worth a darn. I've never tried an actual Python so I don't know how well it's supposed to work, but this thing wasn't worth my time or effort OR money to put into it! Even when it was sucking water and I had the faucet on full blast it wouldn't suck up debris from the gravel like just siphoning into a bucket and letting gravity do the work. I think the only way you could get this thing to work in this state would be to hook the waterbed fill kit up to the bathtub faucet somehow since you'll be at a much lower point than the fish tank that way.
 
I found this, is this the same as what you made ?

DIY Python

Same principle, but that valve they used is major overkill and is going to be a hassle to keep control of. It's much easier in my opinion to use a water hose shutoff valve. You can get one at any store that has a garden section for no more than $2 for a plastic one. Not to mention I'm sure that brass fitting wasn't cheap. The clear tubing they used is also pretty expensive. Although maybe using a smaller diameter hose like they used might increase the suction on the gravel vac.
 
i just use a normal piece of garden hose as the end of mine, to suck stuff up, and i have really good suction. I drain mine out the window, but the height difference between ends of the hose are only about the height of the tank. i wonder why urs is so bad? ur using the sink to drain it? maybe the sink isnt very much lower than the tank? or at all?
 
i just use a normal piece of garden hose as the end of mine, to suck stuff up, and i have really good suction. I drain mine out the window, but the height difference between ends of the hose are only about the height of the tank. i wonder why urs is so bad? ur using the sink to drain it? maybe the sink isnt very much lower than the tank? or at all?

Yeah, the sink is about the same height as the tank. But it's still pretty shabby that it won't get good suction. The only way your tank would be higher than your sink is if you're in a two story house or you have a super high tank stand, which I don't think many people have a tank stand that much higher than their sink. Can't really figure it out. I may give it a fresh try the next water change. Sometimes giving something a fresh try helps because you do something stupid the first time ya know.
 
OK, you've made a really nice effort here with good pictures and all and I've just stumbled upon it in the middle of my weekly water change (cross your fingers that my fish don't jump out the open lid while I reply!)

I am a happy user of a real Python but I don't use it really in the way that is typical I don't think. First of all let me say I have nothing against DIY hose units, I just happened to go with the Python company because they had a large choice of brass adapters for all sorts of less common makes of bathroom faucets and were able to accomodate mine, plus I found the other Python interchangeable parts to be good quality. Mine works just great but let me describe how I use it.

For the gravel clean I really use it just as a simple hose. I do not use the suction unit that operates from faucet water force at all. I have the gravel cleaning cylinder on one end and at the other end the tank water just drains out at the end of a long 25 or 30 foot section of the clear hose.

What I always do is drain into a "catch-bucket." This is for 2 or 3 reasons. Number one, I want to retain at least a large cup of tank water for easy temperature comparison down in the bathroom. Number 2 I often want this bucket of tank water for cleaning filter media. Number 3 I like the idea that I can catch the rare occurances where small fish like neons or danios or such manage to go down the tube (I've had this happened but there they were in my catch-bucket and I can put them back.)
I also like that the hose is clear the whole way so I can see where the small fish are if they get trapped in a section, then I can pour the water on to the catch-bucket and get them. I also like that the clear hose happens to be lighter weight and can coil up under my bathroom sink without taking too much room or being too heavy.

OK, so where does the catch-bucket go? I always use it either out on the garden patio (where the catch-bucket overflow just waters the garden) OR I use it (in bad weather) in the bathroom tub (the bottom of which sits down at floor level - this is important) and I make sure the very end of the drain hose wraps neatly in the bottom of the catch-bucket so that I know it is at the lowest elevation possible. My tank is only about 2.5 feet up on a fairly normal tank stand.

Back at the tank, to start the siphon process all I do is fill the cylinder with tank water and lift it a short way above the water surface (you have to be careful not to splash outside your tank or to let the hose bang against things inside or outside the tank so it pays to be careful when first learning this process.) You lift the inverted cylinder, the water starts to do down and then you gently but quickly go back below the surface with it to allow the siphon process to continue. Simple siphoning is really much better than the sink faucet suction thing in my opinion. The 2.5ft. of elevation drop is just enough to create a decent rate of gravel siphoning power but everyone has to size their cylinder and hose a little for different sized tanks.

After I've gravel-siphoned to my desired percentage water change I lift the cylinder out of the tank and "walk" the water out of the hose down to the catch bucket and then hook the other threaded end up to the brass adapter on the faucet (which I've already adjusted to be a temperature match based on the catch-bucket water.) I then add Prime (or whatever conditioner) to the tank (at 1.5x dose for tank volume, very roughly) and position the cylinder back in the tank for the refill such that the initial force of the arriving water cannot flip it out of the tank when I'm not there (I'll be 25ft. away in the bathroom when I turn on the tap water.) I never allow myself to do other work during the fill but focus on watching the last few inches so as to never forget and overflow into the room. As the water line reaches the bottom of the top tank rim I walk down the hall and turn it off, leaving some air space behind the rim between the surface and the top glass and lighting gear. I have another matching catch bucket (big-box stores have these nice translucent double and triple stacking buckets) to place my wet cylinder hose in.

Anyway that's just my 2 cents that basically I've found gravity to be better than those water valve suction things. Hope it shares a few ideas other people might use. ...gotta get back to my water change!

~~waterdrop~~ (aka WD)
 
That's almost exactly how I do it wd. Except I go out a window. First floor. Sometimes with a catch bucket sometimes not
 
Yeah the T-valves just don't have the suction to effectively vacuum the gravel. This is the method I've decided to use as well from now on. I'll just use my faucet to put water back in. I'm abandoning the T-valve.
 
Yeah, the T-Valve and even the shut-off valves all turn out to be trickier to use than just setting yourself up for simple siphoning. An interesting aspect of that is that I've found myself thinking long range about tank placement differently. I have a room that I someday may want to site a tank in but it is two steps -down- from the first floor main level and I now know to think long and hard about how I'm going to deal with wintertime water draining!

Back to the hoses. Over the years I've ended up having a number of thoughts about them. On the one hand you can of course not get too caught up in details, which is fine in many ways.. but when one does get to thinking about details you can't help but notice that there are quite a few trade-offs. The thicker hoses have the advantage of being tough when pulled around corners or against rough surfaces. They also resist kinking a little better. On the other hand kinking is still a problem with many types of hose and is perhaps one of the most bothersome things about using hose changes of fairly long distance with corners to go around. Sometimes I wonder about drawing a hot tub of water and throwing the hose in prior to using so that the plastic will be soft, but that seems too wasteful of energy and time (I suppose one could set it out in the sun an hour ahead!) The thinner and more bendable the hose, the easier it is to use around your tank without the hose bumping things too hard.

I also still find it hard to recommend correct sizes of cleaning cylinders to beginners. There are a fair number of trade-offs to cylinder size. Put too big a system in a small tank and the process goes way too fast for good cleaning. Tall can be nice for reaching down in tall tanks but is a problem for refilling and moving under center braces and being easily moved in planted tanks. Too small and the opposite sorts of things happen. I've always wondered if aquarists more experienced than I have figured out any clever rules of thumb about cylinder diameter and such.

WD
 

Most reactions

Back
Top