dylema
Fishaholic
Over the last few weeks I have been thinking about adding a sump to my 3’ aquarium to increase the water volume so I could add more fish. It soon became apparent that there is one major issue with adding a sump to a non-drilled tank: The Overflow. Looking around it seemed that an overflow box was the best choice since it does what needs to be done: allows water to siphon out of the tank when the water level rises above a certain level and will stop siphoning when the water drops below that level. And most important, it will re-start when the water level rises again. So as long as the siphon is maintained the system will work.
I also discovered that for two acrylic boxes they are frightfully expensive. So I got to thinking how can I make one of these myself. I drew up plans and worked out that I could probably bend acrylic after heating it and I hoped I could drill it without breaking the sheet. It seemed quite possible but not really easy to get a good product. During my research I found a device called a ‘Durso Stand Pipe’ which promises to make the overflow more quiet. One night as I was thinking of something else an idea popped into my head. I though a bathroom sink has an S-bend pipe which holds water why can’t I use an S-bend to maintain my siphon? A U shaped siphon tube with an S-bend into a ‘Durso Stand Pipe’. What a simple idea. So here it is
“Dylan’s Overflow”.
My specifications are base on a flow rate of about 1000 liters per hour. This idea could easily be adapted to a larger flow rate.
What you will need is 25mm internal diameter piping:
· 5 x 90° bends
· 5 x 30mm lengths for joining
· 1 x T piece
· 1 x end cap
· 1 x 200mm length of pipe
· 1 x 150mm length of pipe
· 1 x length of pipe to sump
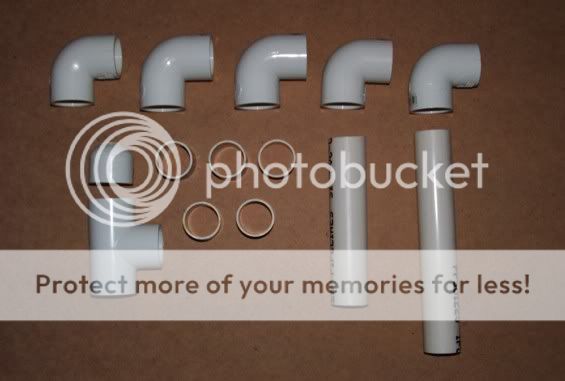
note, drain pipe not shown.
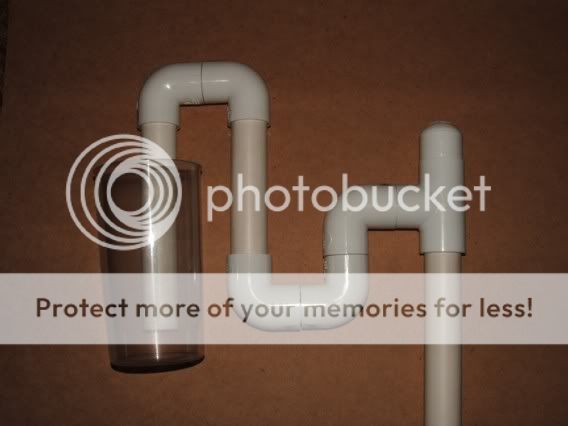
To put this all together you will need to fix the joins with pvc glue or silicone but you can test it out first as the joins are fairly tight even without glue. Start with the siphon tube take two 90° bends and join them with one 30mm piece of pipe. On one side put the 200mm pipe and on the other the 150mm piece.

Next make another U with two more 90° bends and another 30mm piece. Put this U onto the 150mm pipe.

Next Join the T piece to a 90° bend with a 30mm piece and join the 90° bent to the previous U.

Nearly done. Drill a tiny hole in the end cap, I used a 1.5mm drill. This is to prevent a full siphon down to the sump which would drain the pipe and stop the siphon probably ending in disaster.

Now you can put the end cap onto the top of the T with the last 30mm piece. The drain pipe to the sump attaches to the bottom of the T. You will also need a larger tube with a sealed bottom inside the tank to keep the siphon tube submerged and to keep the water in the main tank level. I used a clear plastic tube which already has the bottom sealed. The top of this tube will be the minimum water level in the main tank. Alternatively you could make another U and have a tube up to the water level (I have not tested the latter but in theory it will work).
I tested this using a large square bucket acting at the main tank and my bath acting as the sump and it worked perfectly. I tested the flow rate by having a 9 liter bucket on the bottom of the drain tube and timed how long it took to fill. It took 30 seconds, I repeated the test a number of times to check and every time the bucket filled in 30 seconds or less. This gives a flow rate of 1080 liters per hour.
Here is a 'paint' diagram to further illustrate.
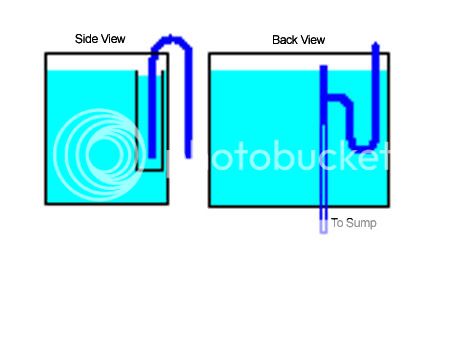
Important notes:
-The T piece must be above both ends of the siphon tube otherwise water will run out of the tube and break the siphon
-The hole in the end cap must be large enough for air to rush in and break the siphon at that point when the water level drops. 1.5mm was enough in my testing but check for yourself. A larger hole will slow down the device slightly but will be safer.
-All joints must be sealed to prevent air entering and breaking the siphon
To increase the flow rate there are two things that can be done:
Firstly increase the size of piping.
Secondly increase the length of the 200mm and 150mm pipes which will make the siphon stronger due to a larger drop from the water surface to the base of the S-bend. (if you use this method you will need to extend the end cap tube to bring it above the tank water level so there is not chance of water coming through the hole).
I also discovered that for two acrylic boxes they are frightfully expensive. So I got to thinking how can I make one of these myself. I drew up plans and worked out that I could probably bend acrylic after heating it and I hoped I could drill it without breaking the sheet. It seemed quite possible but not really easy to get a good product. During my research I found a device called a ‘Durso Stand Pipe’ which promises to make the overflow more quiet. One night as I was thinking of something else an idea popped into my head. I though a bathroom sink has an S-bend pipe which holds water why can’t I use an S-bend to maintain my siphon? A U shaped siphon tube with an S-bend into a ‘Durso Stand Pipe’. What a simple idea. So here it is
“Dylan’s Overflow”.
My specifications are base on a flow rate of about 1000 liters per hour. This idea could easily be adapted to a larger flow rate.
What you will need is 25mm internal diameter piping:
· 5 x 90° bends
· 5 x 30mm lengths for joining
· 1 x T piece
· 1 x end cap
· 1 x 200mm length of pipe
· 1 x 150mm length of pipe
· 1 x length of pipe to sump
note, drain pipe not shown.
To put this all together you will need to fix the joins with pvc glue or silicone but you can test it out first as the joins are fairly tight even without glue. Start with the siphon tube take two 90° bends and join them with one 30mm piece of pipe. On one side put the 200mm pipe and on the other the 150mm piece.
Next make another U with two more 90° bends and another 30mm piece. Put this U onto the 150mm pipe.
Next Join the T piece to a 90° bend with a 30mm piece and join the 90° bent to the previous U.
Nearly done. Drill a tiny hole in the end cap, I used a 1.5mm drill. This is to prevent a full siphon down to the sump which would drain the pipe and stop the siphon probably ending in disaster.
Now you can put the end cap onto the top of the T with the last 30mm piece. The drain pipe to the sump attaches to the bottom of the T. You will also need a larger tube with a sealed bottom inside the tank to keep the siphon tube submerged and to keep the water in the main tank level. I used a clear plastic tube which already has the bottom sealed. The top of this tube will be the minimum water level in the main tank. Alternatively you could make another U and have a tube up to the water level (I have not tested the latter but in theory it will work).
I tested this using a large square bucket acting at the main tank and my bath acting as the sump and it worked perfectly. I tested the flow rate by having a 9 liter bucket on the bottom of the drain tube and timed how long it took to fill. It took 30 seconds, I repeated the test a number of times to check and every time the bucket filled in 30 seconds or less. This gives a flow rate of 1080 liters per hour.
Here is a 'paint' diagram to further illustrate.
Important notes:
-The T piece must be above both ends of the siphon tube otherwise water will run out of the tube and break the siphon
-The hole in the end cap must be large enough for air to rush in and break the siphon at that point when the water level drops. 1.5mm was enough in my testing but check for yourself. A larger hole will slow down the device slightly but will be safer.
-All joints must be sealed to prevent air entering and breaking the siphon
To increase the flow rate there are two things that can be done:
Firstly increase the size of piping.
Secondly increase the length of the 200mm and 150mm pipes which will make the siphon stronger due to a larger drop from the water surface to the base of the S-bend. (if you use this method you will need to extend the end cap tube to bring it above the tank water level so there is not chance of water coming through the hole).

")
 Looks good.