Ben's Kitchen Tank Project Log

BenPursglove

Fish Fanatic
Joined
Jan 11, 2009
Messages
194
Reaction score
0
Location
Derbyshire, UK
Good day to you all.

Following the gift of a used Rekord 80, my second tank is born :hyper:

The tank was pretty messed up with about 2 tons of silicone sticking a crappy Juwel 3D background to the inside - 3 hours with window stanley scraper later and a rinse out, I had a clean tank.

The hood was despatched with as was broken and this will be open top anyway. Not sure whether to keep the bottom frame or not :look:

Acquired Tetratec EX600
Acquired Hagen Glo 61cm luminaire
 
Right, the initial idea when getting this tank was to have it on my desk where I have my PC (yes in the kitchen - tis a bit cramped round here)

After having it on there for a week, I decided I felt like a discus in 1 gallons, a stand would have to be sorted.

The proposed place was behind where the PC is, in the kitchen :good: with signed authorisation sought from Wife :good: Project log follows...
 
Tank stand building today :shifty:

Decided to build a stand myself - I think I'm a reasonable DIY'er, split log due to image attachement limit ensues...

Acquired 18mm MDF board
Acquired wood dowels
Acquired wood glue
Already acquired: Powertools - hand drill, jigsaw, hand sander

Did a CAD mockup of what I wanted just to get it in my head. Overall dims decided at: 936 x 800 x 300

Marked out and chopped MDF up to required sizes with jigsaw, cleaned up with sander. All dowel joint positions were marked then drilled (by pencil and eye :hyper: ), dowells tapped in and glued after a quick dry fit (measure twice cut once people :good: ). I used two blocks of off-cut MDF to hold the mid shelf up with dowels at the back.

The width of the MDF from B&Q was 600mm which conveniently allowed me to centre mount the back panel leaving gaps left and right for hoses, leads and general gubbins to the tank.

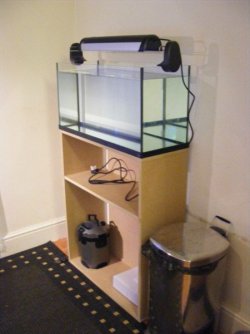
I have no pics of the build process but here is the finished result (pre painting)

DSCF3454.JPG

Have stuck the tank on here and filled with the wet stuff to get some weight on the glued joints as they dry = good glueing :good:

I'm extremely happy with the build as I havnt done a 100% wood build of anything for years - it worked out well I think.

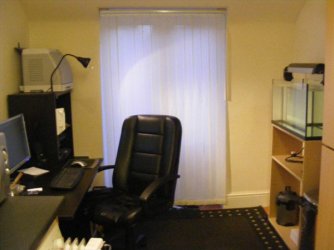
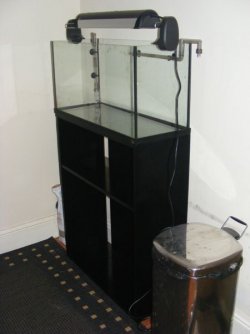
Here's where the tank lives in the little open area at the end of the kitchen behind my PC desk. Looks in a good position whilst we cook. Wife even approves :hey:

DSCF3453.JPG
 
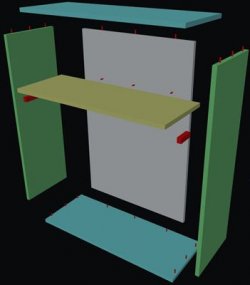
For those remotely interested here is the DIY self build tank stand info which I have coloured up for ease of use. This stand is far stronger than any tank manufacturers stand because it is MDF and not chipboard MFC that the big manufacturer uses. Also, the joints are dowelled and not cam / pre-drill jointed which is also more robust.

Of course you can bespoke these board dimensions to suit your tank - I think any tank larger than 120 cm wide or more weight than 120 litre would need at least 1 centre post on the front. It's all to do with how crazy and/or lucky you feel I guess. On the Rekord 80 I feel crazy and lucky so have relied on the end/back panels to keep things vertical. MDF is a very strong board, when dry, so you may get away with more than I recommend :blink:

Exploded CAD diagram for reference
post_47786_1237063752.jpg

In the above image:
Blue: 2 number 800 x 300 x 18mm MDF - (Top and bottom)
Green: 2 number 900 x 300 x 18mm MDF - (Left and Right)
White: 1 number 900 x 600 x 18mm MDF - (Back)
Yellow: 1 number 764 x 280 x 18 mm MDF - (Shelf)
Red: Round things - 6 x 40mm dowels
Red: Square things - 40 x 50 x 18mm MDF offcut shelf supports

I ripped all the boards down to suit the sizes above. Dry assembled whole thing using gaffer tape on the bench. This allowed me to place pencil marks on the internal corners between internal board joint corners where I would like to place a dowel joint. No measurement was used, just this: stick in a pencil mark on each board per dowel hole that you want. I then ripped the dry fit apart, eyeballed and marked the drill positions then got busy with Mr Bosch drill @ 6mm (which is the bore of the dowel) at every required dowel point. Then glued dowels into top / bottom board with quick dry PVA (the EVOstick one)

2nd dry fit after the dowels were dry (actually getting dowels into dowel holes) and it all went together well after a tap from Mr Tapometer (hammer). I was crapping this stage as if my eyeballing of dowel drilling was not good, the whole build would be ruined. However it was all good :good: :crazy: :hyper: and I believe yours will be too if enough care / time is taken.

Final fit involved tapping and glueing the whole shebang together and glueing the shelf blocks in place.

After 1 hour (quick dry PVA watchout!) I manhandled the new cabinet into it's resting position in the kitchen, whacked on the tank and filled it so that I could get pressure down through onto the curing glue joints.

My whole build took 4 hours but I do faff up and down making sure things are precise - an experienced builder would have this nailed in 1 hour I guess.

Jobs a good un, next step is to paint the cabinet.
 
looks good!

My LFS has a heavily planted tank with just cardanel/neons they stand out loads.

But i think any small shoaling fish with bright colours would be nice in there. :good:
 
looks good!

My LFS has a heavily planted tank with just cardanel/neons they stand out loads.

But i think any small shoaling fish with bright colours would be nice in there. :good:


Second the Cardinal Vote. A couple hundred would look ace. :good:

CHEERS
Thommo
 
Thanks for the replys peeps.

Have considered DP not really sold on them (or it as would have to be).
Got a shoal of 9 Cardinals in tank #1 - may consider transfer and a shoal bloat once planted and cycled...
Any other thoughts on possible 1 species stock?
Tank is 80x30x40 @ approx 70 litres when I fill it to where I want, including assumed displacement.

Acquired 2 x T5HO bulbs @ 6700K.
Acquired satin black paint for stand.
Acquired achy elbow from day of rollering said paint onto stand.

Here's a picy of the first coat on, bottom rail is missing a coat due to daft way I went about painting.
Been faffing with the filter inlets and outlets, will probably switch them round on final setup as I don't like to see the suckers of inlet as you first view it.
Bulbs also in to test unit.
DSCF3456.JPG

Tomorrow it'll all get a sand and hopefully final coat weather permitting...The black looks good with the other black kit in my kitchen office I think...

Have also been looking at pressurised CO2 stuff (my first) - any sets or set ups that you good people could recommend? Bloomin pricey to get going ain't it?
 
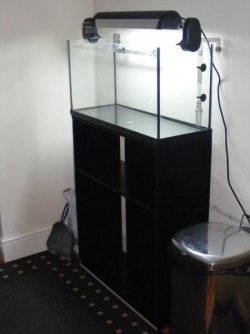
Mini update, enough with the painting posts already I here you cry! This is the last one, promise. Top coat now on - lovely satin finish to the black :good:

DSCF3459.JPG

Next step is to look for some nice rocks or wood and decide on what plants...
 
Kitchen-office, hmm, I like it. Never like to be far from a scooby snack when i'm working!

Nice job on the custom stand, looks slick. Regarding stocking, really depends on what decor you're going for in the tank. Also, are you sure you want to limit to one species? What's your reasoning?
 
Start your aquascaping first, get the hardscape and planting done, then think about fish.
You have then something to look at and visualize different types of fish, choose whatever you think would work best with the aquascapes qualities.
 

Most reactions

Back
Top