Ballast

The December FOTM Contest Poll is open!
FishForums.net Fish of the Month
🏆 Click to vote! 🏆

haowin

Fish Fanatic
Joined
Mar 28, 2009
Messages
114
Reaction score
0
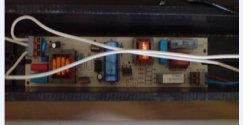
Hey guys, so i got my ballast 2x49w (it came with plastic wrapping atround the circuitry, should i remove it? its glued with some black stuff at the bottom), the specs arent arent a match, existing lamp is 2x30w lamps, i was thinkin in the future of getting some 40w lamps. but i thought i'd give underdriving the ballast a go. supposidly the ballast would run at a cooler rate?
So im having a little trouble sorting it out. Some reassurance would be good.
Sorry it looks scruffy
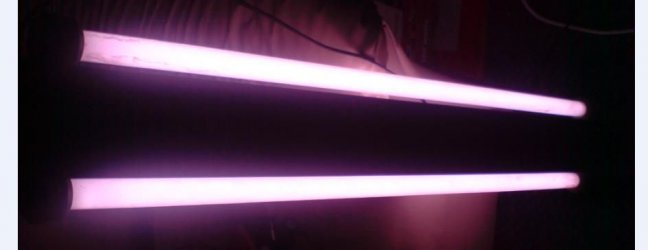
Existing lamp unit, so bascailly 2 lamps share one connection (the other lamps under the lid), and the other end of the lamps have an additional single connection to the ballast, 3 white wires in total.
lamp.JPG
untitled.JPG
So im not 100% sure on the new ballast.
not sure where the wires go from the plug. also in the old lamp unit it only has 2 wires from the plug, blue(neutral) and brown(live)
It doesnt have an earth wire, should i change the cable so it has an earth wire? (i read its about the loss of current or something)
plug.JPG
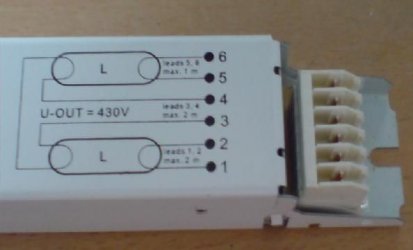
Should i add more wires, shouldnt be too hard, i'll just need some more wire or something, its copper wiring? what i was thinking was 1 wire to terminal 6, 1 to terminal 1 and where the 2 lamps are connected by the one wire into terminal 3.
lamp w.JPG

Well any help would be great, thanks
 
LOL I'm confused now. Judging by how different everything looks to me your probably not in the US. Well first off using a higher rated ballast to drive lower wattage lights is actually called overdrving the bulbs. The ballast will put out the same amount of energy, but into a lower wattage light. This will increase the intesty of the light, but not as much as if you where actually running 2 49watt bulbs. Things are also going to get hot. I suggest doing some research into over-driving before wiring these all together. Its personally not something I would do, I do know that quite a few people do it and have success. However you will shorten the lifespan of those bulbs by forcing extra power through them. There is a weak correlation between over-driving and light fixtures starting on fire.

Follow the diagram on that ballast for proper wiring. It should be wired with 4 wires going to the bulbs, which is how pretty much all 2 bulb ballasts work. The number of hookups on the ballast can vary a little Yours is weird, but make sure the wire you get is rated properly a ballast puts out a strong current. Its safer to run with an earth wire, which means you should have a power-cord with 3 prongs hence 3 wires. The ground wire attaches to the metal case. Do you have a voltage meter as it does help make sense of things? When you cut those cord on your old fixture you will probably find that there are actually 2 wires there. If so things should become a lot more clear. At least I'm considering that your bulbs have 2 pins on each end.... Personally though if doing this I would run 2 49 watt bulbs. These will be longer than your current bulbs, which probably means they won't fit in your hood. Also you should have a GFI/GFCI or some other power interrupter on that outlet incase something does go wrong. Simply having water in close proximity to electricity is a good enough reason to have a GFCI. I build my hoods too and other electrical devices, I won't run a tank without one.
 
Thanks for the help btw. yea im not in the us, greetings from the uk
lol. I was just looking around for bulbs and what not. I was thinkin of changing cold to saltwater so was Looking at some SW lamps and theyre 45w, 895mm, 30w wouldnt be enough generally right? my tanks approx 40g, is the 4w still too much difference?
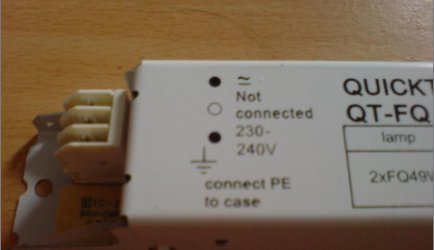
From the plug to the ballast, where it connects to the ballast, Can u tell what the 3 options are, its kinda crammed into together like where the 3 wires would go, live, neutral, earth. I'll change the plug cable so it'll have the earth.
The lamp connections to the ballast shouldnt be a problem. yea the bulbs have 2 pins either side. but the old unit had only 3 wires sooooo u rekon i should add the wires so it'll have the full 8?
btw alot of heat eh? when i got the ballast it came in a plastic wrapping, its inside the metal casing. is that normal?
blik.JPG
 
The metal case acts as a heat sink and it should stay in the metal casing. Your ballasts are really weird compared to what I see in the US. Any ballast I've had is totally fused in a metal case.They have wires coming out of them and no way to get to the circuitry. So as far as the plastic I can't help you on that.

Like I said when you cut one of the white cords you may find there are actually two wires inside of it. If their is only one wire inside the white cords, then I would attach wires to... For example) the 5 and 6 spot these will then both attach to ONE of the white cords.... I don't know what to do for the 3 and 4 positions. You could try running just one wire and if that doesn't work then try both. A 4 watt difference should not matter. SW bulbs will look very weird on FW tanks as they are very blue.
 
If you have only a two prong plug connected, the earth connection and the "neutral" connection can be tied together. This assumes you have a polarized plug that will only go one way into the supply system. In the US they use a wider and a narrower plug prong to connect only one way on a polarized plug but I have no idea how it is done on a standard 230 volt arrangement. In the US, everything is at 110 to 120 volts.
Again a US standard is to use a white wire as the neutral connection. Although it is nice to have a separate ground (earth) connection on a US fixture, you can get a functional circuit that uses only two wires by connecting both the ground and neutral connections to the same external wire. (The ground wire in the US is green)
Using your ballast wiring diagram, it looks like terminals 1 and 2 go to one lamp while terminals 5 and 6 go to the other lamp. The two lamps would be wired to each other and not to the ballast, if I am reading it right.
 
cheers guys :good:
when i recieved it, the ballast looked like it had been tampered with, under my presumption it was brand new, so i was sceptical, so i opened it up, and to my surprise good ol' plastic. didnt half sink when u wrote about the major heat.
The black part of it feels much cooler than the other parts, so dno if its there as additional coolant or something, but the actual plastic around its making me drop some bricks. lol, erm i am really appreciative of the help, but the actual 3 wires, live ,netural and earth, can u tell which in the 3 positions it goes? like the underlined squiggly line, thats earth? 'not connected' is neutral?, and 230-240v is live? but then in the same point its got the earth symbol right?
the plug itself is 3 prong, but the earth wires not wired up to it, the old unit as u can see only used 2 wires, presumably the live and netural, but im not 100%, because when i got it, it didnt work anyway.
Not too sure which way to approach this,
so should i give it ago wiring it up as it is (should i be wary of exploding lamps, any irrepairable damage?), see if it doesnt work or not, if it doesnt, then buy some more of the wire connecting the lamp to the ballast, then wire that up, its gonna be some time till i buy the other lamps, they cost like £20 each. so i wanna know the units gonna work before i buy it.
the ballast to me, looks like there should be 2 individual wires at one end of the lamps T(1)+(2) at one end of the lamp, T(6)+(5) on the other lamp, one connecting the 2 lamps together and then 1 wire for the remaining slot from the other end of the lamp to the ballast T(3)+(4). so 6 all together. im havin a hard time pieceing what you guys are advising me to do sry,
@mika
terminal 5 and 6 attaching to one wire if theres only one wire inside the white cable and not 2? ah, its a solid wire, not fibres. so its one or the other.
I cut one of the white wires to have a ganders, its just one solid wire, not 2 :/
@oldman (liking the name :good: )
i agree with what your sayin bout the wiring the ballast, except for terminals 3 + 4, looks like they go from the end where the 2 lamps connect together to the ballast right?

Can i use the wires from a cable, the live, neutral, to wire up the lamps. like, will they be suitable for wiring up the lamps ot the ballast?
 
This is the most I can help. Below is the information sheet that came with my ballast. However please note this is for wiring a Power Compact bulb. A PC is similar to yours except the bulb is bent in a U shape and has all 4 pins on one side Piccy. It is really wired the same way as yours is, except the wires don't run together. I would follow the diagram and wire 5 and 6 along with 1 and 2 together. I made X's where you shouldn't follow the diagram. Your white wire that splits to both bulbs should be wired in the 3 position, if that doesn't work try wiring 3 and 4 together like the other two are.

IMG.jpg
 
thanks for sticking with me :good:

Hmmmm T. i think ive got the wiring to the lamp ok, i think ive got a good idea on that, its just the plug to the ballast wire that im not 100% on. ive tried wiring the lamps to the balast with what wire i have. and no light :p. ive checked the current, and theres definately current flowing. dont know why the lamps arent lighting up ><!!!! haha, ahh this is annoying. Rekon i can use the wires from a plug cable to wire up the lamp to the ballast? kinda the same wires right? i wired up the plug cables in, its really weird, and checked the current. it seems it doesnt matter which position i put the live neutral, theres always a current. though the filament, in my screwdriver is brighter atm with the live on the top. btw starting the lamps with a starter? its the only factor i can think of. my noobyness shows again, how d ya use em? :blush:
 
I am a bit confused by this.

Are you saying you have a new ballast with a starter and are trying to use it with your existing lamps (as shown in the first picture)?

If so they look like T5 lamps and shouldn't be used with that sort of ballast. They should only be used with elecronic ballasts. - Ignore this bit if you don't have T5 lamps, see edit

On the mains connections I think the top one is neutral the middle not connected (as it says) and the bottom live. I think the earth sign and its associated information is just telling you to connect the earth wire to the case.

I am not an electrician and so I can only say what I think as a layman, and I wouldn't go playing about with mains currents unless I was sure about what I was doing!

EDIT: I've just googled 30 watt tubes and they appear to be 36" T8 bulbs so they may be O.K. to use with a ballast with a starter.
 
im not gonna lie, it was fun lol. just stripped some wire from a hairdryer, used the live wire to wire up the lamps to the ballast. yea your right, tops neutral, bots live. Accidently figured it out before i read your post, had the plug wires in the wrong places so tried out some others, didnt half S*it my pants when the lights just suddenly came on lol.
havent connected an earth wire tho, dont really know where it'd go. attach to the case? any ideas?
atm its 30w. its a 49w ballast, is the worst thats going to happen is the lights are gonna stop workin? can they literally going to explode?

all in all, £8 for the ballast, -1 hair dryer. Profit £60?
:lol: winner
Cheers for the help guys :good:
k.JPG
 
It sounds like you now have a functional light fixture. The ground (earth) is a safety feature that makes it safe to touch the case of the fixture. If yo0u do not connect it to the circuit ground, the fixture will work fine but the fixture case can become energized. If you can figure out which side of the wiring goes back to an earth ground, it would be better to attach that side to the grounded side of the circuit than to leave the fixture "floating" without a ground. If you do not know, don't take a chance and wire it backward. That would almost guarantee that the case would be live.
 
It sounds like you now have a functional light fixture. The ground (earth) is a safety feature that makes it safe to touch the case of the fixture. If yo0u do not connect it to the circuit ground, the fixture will work fine but the fixture case can become energized. If you can figure out which side of the wiring goes back to an earth ground, it would be better to attach that side to the grounded side of the circuit than to leave the fixture "floating" without a ground. If you do not know, don't take a chance and wire it backward. That would almost guarantee that the case would be live.

hey oldman, yea its workin :lol:
so if i got this right, the earths to make sure any current flowing into the metal casing is returned to the plug? so theoretically i could just attach it to the case right? really not sure how to find out which side of the casing is meant to go bak to the ground but it'd be on the same side right? they're not gonna expect to have a 1 inch live, neutral and 7-8 inch earth?
I guess its not gonna go into the 'not connected' terminal?
the ballasts in the plastic unit, so it shouldnt really be a hazard? but i did removed the water tight sealant so i guess water could will eventaully get inside the casing, plumbers tape the gaps?
 
really not sure how to find out which side of the casing is meant to go bak to the ground but it'd be on the same side right? they're not gonna expect to have a 1 inch live, neutral and 7-8 inch earth?
The casing is made of metal so it doesn't have a "side", its all at the same potential. The usual way of connecting the earth wire would be to clamp it under one of the fixing screws, (remove a bit of the paint so it makes good contact) - same disclaimer abount me not being an electrician.

the ballasts in the plastic unit, so it shouldnt really be a hazard? but i did removed the water tight sealant so i guess water could will eventaully get inside the casing, plumbers tape the gaps?
You should use a bead of aquarium silicone sealer to seal the gaps. Houshold sealants will probably contain mold or fungus inhibitors which could kill the fish.
 
thanks,
I havent got any of the aqua silicone, will head out tomorow to get some. will wire up the earth then n all, taped it up for now.

cheers again for your helps :good:
 
earth goes under a fixing screw reading through the thread apart from the earth your cracking
(former sparky)
 

Most reactions

Back
Top