pmb_67
Fish Fanatic
Ok, so the long-running saga of me setting up a 400-litre Rena tank has finally reached the stage where I'm putting a sump in the right-hand cupboard of the stand. Space is a bit tight in there, so I want to use all of it rather than fit the largest commercially available tank (like a Clearseal) in.
To be more specific, the sump can be 38cm square on the base and around 50cm tall I think (need to check again how much room I need to leave to be able to get the skimmer cup off) - and will be fed by a Tunze overflow [sorry drilling fans, I just don't have the guts to drill the tank!] [though I am going to have to mod the lid and rim slightly]. Said overflow apparently allows the tank water level to drop 2cm when e.g. power failure causes the return pump to stop - at 150cm long by 50cm deep (as in front to back, not water depth) I reckon that equates to 14.2 litres of water from the tank plus whatever's in the overflow unit and pipe - so worst case estimate 20 litres of water heading downwards [which conveniently fits with Tunze's own version (at several hundred £'s all in) that has a "safety volume" of 21 litres I think], causing a 14cm rise in the level in my sump if I use 10mm glass - which sounds a lot to me... Anyway, all told I think I'm ok on the whole flooding issue
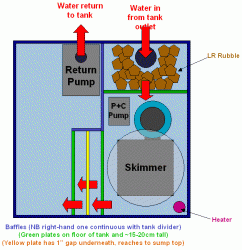
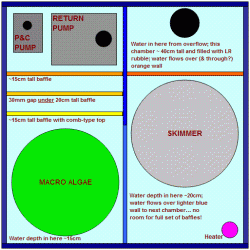
What I'm planning to put in the sump is a skimmer (already got a Tunze 9010 for the purpose), a heater (one will remain in tank - it came with 2 and I'm keeping them both to have redundancy), the return pump of course, plus a small pump supplying water slowly to a phosphate reactor sitting in the other side cupboard. Also in said cupboard will be a 25-litre storage can of RO water to supply a Tunze top-up gizmo sitting in the sump. Finally, I was wondering about putting in a denitrator at some point if I can't get the nitrate to hold at a low enough level - but am a bit worried about the space it would take up.
Anyhoo, today's questions (for those not bored to sleep by the above) are:
1) What should I do about the design of the inside of the sump? What I've come up with is a tall vertical wall from the middle of the back wall to the centre of the tank, so that looking down from above it has a U shape - with water coming in at one end and back out at the other side of the U so that it has a chance of getting skimmed and dephosphated. And a second idea was to supplement that with a shorter wall across the middle left to right - so that water has to flow over both of these and spends longer going past the skimmer etc. Then I was wondering if I need the first interior wall to extend to the front of the tank but have a gap at the bottom so that water truly has a really well-defined path past the various intakes. Is this all over-complicating things? Will it reduce the flow rate and cause flooding?
2) Should I have a partial or full-sized (removable) lid to reduce evaporation? I was thinking of a permanent lid from the back to about 1/3 of the way to the front, with appropriate holes for the drain and return pipes, then a removable one to keep water loss down over the rest, but allow access to the skimmer cup.
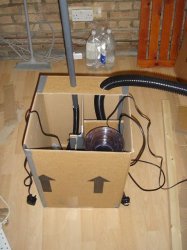
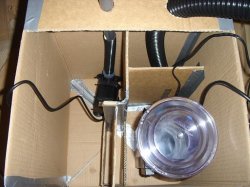
3) What about materials? I'm thinking this is worth having a pro build me a decent glass sump rather than bodge one myself, though I like the sound of making one out of perspex as I can confidently cut and drill it!!! I was also thinking first thing I'd do is make one out of cheap plywood or something to check everything fits together ok - not to actually use - am I just being over-cautious?
Thanks in advance everyone! And sorry for the lengthy (as ever) post!
Paul


 /www.fishforums.net/content-page/202...ation/page/280/
 so I'm just going to wait and see if anyone comes up with advice on whether I should adjust any of the sizes. Then it's tank-builder hunting - anyone know someone in the London area who'll have a crack at a slightly tricky sump?


 Am wondering now if I can extend it to the layout of the full tank - i.e. building a box the same size as my tank, but with the front removed - and dumping some big polystyrene blocks in to simulate the LR positioning... I reckon practicing the layout without the constraints of all that glass could be a good move